
Enterprise Collaboration with Liferay
Onward to Apache Land
Install Apache as described by your Linux vendor, or go to the /opt/install directory and untar the Apache source:
tar -zxvf httpd-2.2.4.tar.gz
See the Apache server documentation [4] for more on building Apache from source. Keep in mind that your web server will need to access Java functionality through Apache Tomcat. The mod_jk module facilitates communication between the Apache web server and Tomcat. Create a workers.properties file for mod_jk:
vi /opt/liferay-4.4.2/conf/workers.properties
A sample file is shown in Listing 3. Next, place the mod_jk apache module
cp /opt/install/ mod_jk-1.2.25-httpd-2.2.4.so / opt/apache2/modules/mod_jk.so
and edit the httpd.conf file:
vi /opt/apache2/ conf/httpd.conf
Make sure and set the user and groups for Apache to run under to user "apache" and group "apache." Also, don't forget the ServerAdmin directive. Add the following lines in with the other include directives:
# Include mod_jk
Include /opt/apache2/conf/mod_jk.conf
Now, create the config file for the tomcat connector
vi /opt/apache2/conf/mod_jk.conf
and create the default vhost configuration file. Make a directory in which to put vhosts:
mkdir /opt/apache2/conf/vhosts
and create the vhost file.
vi /opt/apache2/conf/vhosts/w3.conf
Listing 4 is a default vhost that kicks anything that doesn't fit another vhost over to a w3 (intranet) site.
Listing 3
workers.properties
Listing 4
w3.conf
Remember to change your IP address to match your server's IP address. The Jkmount directives tell Apache what to get from Tomcat.
Note that every vhost-- even the ones handled with Liferay – must have an entry in Apache's config. This entry ensures that any weird hostname that might be requested will go directly to the default page. This will also prevent users from adding their own vhosted domains without having access to the Apache configs.
So that Apache looks for this file instead of the default vhost config, edit http.conf by replacing:
# Virtual hosts
Include conf/extra/httpd-vhosts.conf
with
# Virtual hosts
Include /opt/apache2/conf/vhosts/*.conf
Now set up Apache as a service:
chkconfig --add apache2
chkconfig apache2 on
and bounce Apache and Tomcat:
service apache2 restart
service liferay restart
You should now be able to access Liferay through w3.testdomain.com (replace testdomain with your domain). You must have a DNS record for w3 pointing to the proper IP address (or an entry in your hosts file).
Setting up Your Site
If you are configuring Liferay to act as an intranet portal on an actual production network, you'll probably want to tie Liferay to your organization's user database. On our network, Liferay uses an Active Directory server for authenticating users. Other approaches are also possible depending on the structure of your network. Consult the Life-ray user forums or your favorite search engine. Because authentication techniques vary, this article will not cover the topic, but keep in mind that one of the principal benefits of Liferay is to create communities of users within the network for the purpose of sharing content, and this process works best when it is tied into the network's existing user database.
Once you have logged into the system, add the Communities Portlet by mousing over the Welcome button in the upper right corner of the page (Figure 1), selecting Add Application in the toolbar on the left, and selecting Community | Communities (add) (Figure 2). Use this portlet to create a community for each department.
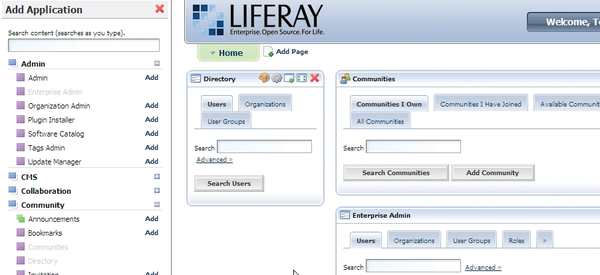 Figure 2: Adding the Communities Portlet to a page in Liferay.
Next, assign members to communities by browsing to the All Communities tab and selecting Actions | Assign Members, select the User Groups tab and then the Available tab, then select the user group you want to map to the community. Commit the changes with the Update Associations button. Do this for every community except for Guest.
Add the Enterprise Admin portlet to the home page and select the >> button. Select the Settings tab and fill in the following information: Name and Mail Domain. Next, go to the Default User Associations tab and list the Guest community in the Community Names box (Figure 3). This will ensure that all users can browse the Guest community pages while they are logged in. Commit your changes with the Save button.
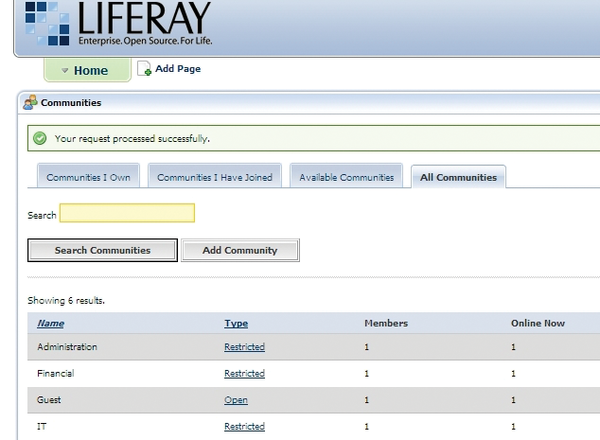 Figure 3: The Community Names list lets the user easily select a community.
After you have installed Liferay and organized the space into user communities, it is easy to add new content pages to the site. Go back to the home page and mouse over the Welcome button and select the Manage Pages option (Figure 4). You can create a public or private page for any of the Liferay communities. Next, mouse over the Welcome button and go to My Places. From here, you can edit the layout of each community's site structure.
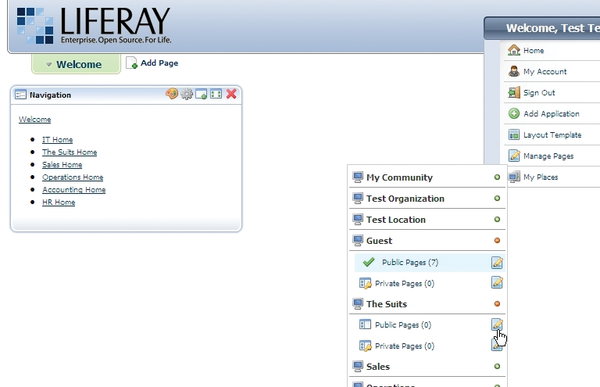 Figure 4: The Manage Pages option lets you create and edit content pages.
Conclusion
Liferay is a big, complex system. Just getting Liferay installed and working is the first and largest hurdle. After that, you can easily use Liferay as a central, reasonably secure approach to collaboration and information dissemination.
Infos
- The Apache Project: http://www.apache.org
- LifeRay: http://www.liferay.com
- Java: http://www.sun.com/java
- MySQL: http://www.mysql.com
- Apache documentation: http://httpd.apache.org/docs/
« Previous 1 2 3
Buy this article as PDF
(incl. VAT)
Buy Linux Magazine
US / Canada
UK / Australia
Subscribe to our Linux Newsletters
Find Linux and Open Source Jobs
Subscribe to our ADMIN Newsletters
Support Our Work
Linux Magazine content is made possible with support from readers like you. Please consider contributing when you’ve found an article to be beneficial.

News
-
Canonical Releases Ubuntu 24.04
After a brief pause because of the XZ vulnerability, Ubuntu 24.04 is now available for install.
-
Linux Servers Targeted by Akira Ransomware
A group of bad actors who have already extorted $42 million have their sights set on the Linux platform.
-
TUXEDO Computers Unveils Linux Laptop Featuring AMD Ryzen CPU
This latest release is the first laptop to include the new CPU from Ryzen and Linux preinstalled.
-
XZ Gets the All-Clear
The back door xz vulnerability has been officially reverted for Fedora 40 and versions 38 and 39 were never affected.
-
Canonical Collaborates with Qualcomm on New Venture
This new joint effort is geared toward bringing Ubuntu and Ubuntu Core to Qualcomm-powered devices.
-
Kodi 21.0 Open-Source Entertainment Hub Released
After a year of development, the award-winning Kodi cross-platform, media center software is now available with many new additions and improvements.
-
Linux Usage Increases in Two Key Areas
If market share is your thing, you'll be happy to know that Linux is on the rise in two areas that, if they keep climbing, could have serious meaning for Linux's future.
-
Vulnerability Discovered in xz Libraries
An urgent alert for Fedora 40 has been posted and users should pay attention.
-
Canonical Bumps LTS Support to 12 years
If you're worried that your Ubuntu LTS release won't be supported long enough to last, Canonical has a surprise for you in the form of 12 years of security coverage.
-
Fedora 40 Beta Released Soon
With the official release of Fedora 40 coming in April, it's almost time to download the beta and see what's new.