Publishing with GitBook
Git, Markdown, Ebook
Write and publish ebooks with the GitBook software and publishing platform.
Using Markdown and Git for producing an ebook at first seems like something that would appeal only to developers and hackers. Indeed, if you are already versed in formatting README files with Markdown and you rely on Git for managing software projects, using these technologies to write and publish an ebook makes a lot of sense. However, this approach has advantages for other users, too, and the GitBook publishing platform [1] offers everything you need to get started.
How GitBook Works
The GitBook-based publishing workflow is relatively straightforward. To begin, you use the GitBook editor to create a book and format it with Markdown. Because the book is just a regular folder containing Markdown-formatted, plain-text files, you turn it into a Git repository and use Git functionality for versioning, synchronization, and collaboration with other contributors. When the book is ready, you use the GitBook editor to push the final result to the GitBook service, which then builds the ebook in several formats and makes it available for sale (Figure 1). The service also takes the burden of processing payments off your shoulders (it charges 20 percent per transaction).
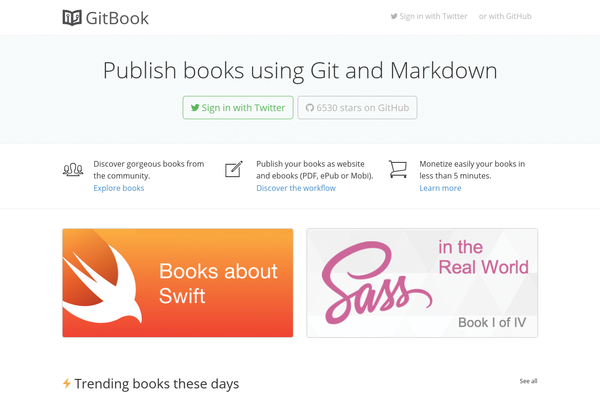
Although GitBook provides a convenient publishing platform, you are not tied to it. Using the GitBook editor, you can generate an ebook in several formats (static website, PDF, EPUB, and MOBI) and sell it through other channels like Amazon Kindle Publishing, Gumroad, and even on your own website. The editor itself is released under an open source license, and its source code is available on GitHub [2]. In fact, a lot of software that powers GitBook is released as open source.
Preparatory Work
To get started with GitBook, you need to do a few things up front: Install the GitBook editor and Git on your machine, configure a GitBook profile and create a book, and set up a Git repository for the book project. Installing the editor couldn't be easier. Just point the browser to www.gitbook.io/editor/download, and you'll be prompted to download the editor version for your particular platform. Extract the downloaded .tar.gz
archive, and make the install.sh
script in the resulting directory executable using the chmod +x install.sh
command. Then, run the script to install the GitBook editor.
You can also run the editor without installing it using the supplied run.sh
script (don't forget to make it executable first). If you plan to use the editor to generate ebooks in the supported formats locally, you also need to install the Calibre ebook suite by following the instructions on the project's download page [3].
Git is available in the official software repositories of most mainstream Linux distributions, so you can install it using your distro's package manager. On Debian and Ubuntu, you can do this by running the apt-get install git-core
command as root. Then, use the following commands to configure Git (replace the default values with your actual email and name):
git config --global user.email "you@example.com" git config --global user.name "Your Name"
Next, you can sign in to GitBook via Twitter or GitHub. Once you've done that, switch to the Settings section and configure your GitBook profile (Figure 2). GitBook conveniently pulls personal data from your Twitter or GitHub account, so you only need to note the token needed for linking the editor with the GitBook service and provide the payment information required to buy and sell books on GitBook. Next, click the plus icon to create a new book, then specify the required book info, such as title, description, visibility, price, and category. Press the Create Book button to create the book (Figure 3).
Next, you need to create a Git repository. GitBook works best with GitHub repositories, so you might want to set up a dedicated GitHub repository for the book. If you already use GitHub for managing your software project, you already know how to do this. Otherwise, the Create A Repo page on GitHub [4] provides step-by-step instructions on creating a repository. When the repository has been created, note its clone URL. It should look something like this: git@github.com:dmpop/my_book_repo.git (where my_book_repo is the actual name of the created repository).
The free plan on GitHub allows you to maintain only public repositories, so anyone can access and fork them. If you prefer to keep your book repository private, you either need to upgrade to a paid plan or use an alternative service like Bitbucket [5], which lets you create private repositories.
Alternatively, you can set up a Git repository on your own server. Instead of rolling out a full-blown Git server, however, you can opt for a quick-and-dirty solution that lets you work with Git repositories via SSH. To do this, you need a remote machine with Git and SSH installed on it. Establish an SSH connection to the server, then do
mkdir my_book_repo.git cd my_book_repo.git git init --bare
to create and initialize a bare Git repository.
Working with GitBook Editor
With all the housekeeping tasks taken care of, you can begin working on the book. Launch the GitBook editor, choose File | New Book, create a new book directory (e.g., my_book), and open it in the editor. The application features an unobtrusive interface, which is split into three panes. The left pane shows the book's structure as an outline, the pane in the middle acts as a no-frills Markdown editor, and the right pane displays the preview of the currently edited text. The toolbar in the middle pane gives you access to basic formatting options (Figure 4).
Note that GitBook supports the so-called GitHub Flavored Markdown (GFM), which includes a few additions and improvements [6]. Although the editor is rather bare-bones, it does include a couple of useful features. For example, it supports Markdown syntax highlighting, which makes editing more convenient. The application also includes the search and replace tools that can be evoked using the Ctrl+F and Ctrl+H keyboard shortcuts. Both tools can handle regular expressions, so you can perform advanced search and replace actions.
The book's structure in the GitBook editor is represented as a hierarchical tree consisting of nodes (chapters) and branches (articles). To add a chapter, choose Book | Add Chapter. You can then add articles to the chapter by right-clicking on it and choosing Add Article. Each chapter can contain an unlimited number of articles, and each article can contain other articles. You can rearrange the chapters and articles by dragging them up and down in the left pane. You can preview the online version of the book at any time by choosing Book | Preview Website.
Buy this article as PDF
(incl. VAT)
Buy Linux Magazine
Subscribe to our Linux Newsletters
Find Linux and Open Source Jobs
Subscribe to our ADMIN Newsletters
Support Our Work
Linux Magazine content is made possible with support from readers like you. Please consider contributing when you’ve found an article to be beneficial.
News
-
TUXEDO Computers Unveils Linux Laptop Featuring AMD Ryzen CPU
This latest release is the first laptop to include the new CPU from Ryzen and Linux preinstalled.
-
XZ Gets the All-Clear
The back door xz vulnerability has been officially reverted for Fedora 40 and versions 38 and 39 were never affected.
-
Canonical Collaborates with Qualcomm on New Venture
This new joint effort is geared toward bringing Ubuntu and Ubuntu Core to Qualcomm-powered devices.
-
Kodi 21.0 Open-Source Entertainment Hub Released
After a year of development, the award-winning Kodi cross-platform, media center software is now available with many new additions and improvements.
-
Linux Usage Increases in Two Key Areas
If market share is your thing, you'll be happy to know that Linux is on the rise in two areas that, if they keep climbing, could have serious meaning for Linux's future.
-
Vulnerability Discovered in xz Libraries
An urgent alert for Fedora 40 has been posted and users should pay attention.
-
Canonical Bumps LTS Support to 12 years
If you're worried that your Ubuntu LTS release won't be supported long enough to last, Canonical has a surprise for you in the form of 12 years of security coverage.
-
Fedora 40 Beta Released Soon
With the official release of Fedora 40 coming in April, it's almost time to download the beta and see what's new.
-
New Pentesting Distribution to Compete with Kali Linux
SnoopGod is now available for your testing needs
-
Juno Computers Launches Another Linux Laptop
If you're looking for a powerhouse laptop that runs Ubuntu, the Juno Computers Neptune 17 v6 should be on your radar.