
KVM virtualization with Qemu and Aqemu
Creating VMs
To create a VM, first go to the bar on the left with the buttons and click on the icon with the magic wand. This step calls up a wizard that will help you to set up a functional VM in a few steps. The options in the dialog tabs for a simple system correspond to those of the defined template.
After completing the wizard, you now need to assign a boot medium to the new machine. The wizard creates a virtual hard disk according to your specifications. Usually, the boot medium is either an optical disc or an ISO image. In the CD/DVD/Floppy tab, enable the optical drive by checking the box next to the CD/DVD-ROM option. In the selection field below, select an appropriate image or a physical drive.
In the General tab you can adjust the keyboard layout. Then launch the VM by clicking on Play. The new system launches in a second window customized in size and resolution. If it responds particularly slowly, you will need to adjust other options after finishing the session.
The wizard sets the RAM size of the new VM to just 256MB. For many distributions, it is recommended to set a higher value in the General tab – the physical memory needs to be around 2GB or more for a typical Live system. For compact distributions such as SliTaz or Puppy Linux, 256MB will suffice.
Aqemu limits the number of usable core processors in the specification to just one. If the host has a modern CPU with HT technology enabled, you can assign two or more cores to the VM in the General tab beside Number of CPU.
To permanently install a launched Live system on the virtual disk, trigger your distribution's installation process and choose the virtual image in the installer as the mass storage medium. You'll find the intended mass storage in the HDD tab of the Aqemu window, usually listed as HDA (Primary Master), including the maximum size of the virtual disk. If necessary, you can adjust the disk size by clicking the Format button when the VM is off.
After completing the setup, check the most important details in the Info tab (Figure 2). You can create several virtual systems, which Aqemu then lists in the program window to the left.
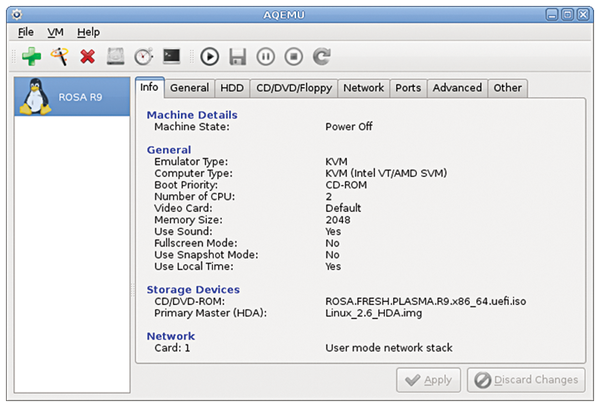 Figure 2: The Info tab provides a system overview of the VM.
Manual Creation
You can also create new VMs manually, instead of using the wizard. Left click on the button with the green plus sign. The software asks for a name for the new system; you can then enter all other settings in the various tabs.
ARM emulation is initially preset in the General tab in the Computer Type checkbox. Change the setting to IBM PC 64Bit so that you can then modify the number of core processors in the Number of CPU field.
When setting up multiple VMs in the Primary Master (HDA) segment, you will want to create a new image for a hard disk for each machine in the HDD tab (Figure 3). Otherwise, Aqemu assumes an image you created previously for the new VM. In the CD/DVD/Floppy tab, you can also modify the image that is used when the virtual system is first launched.
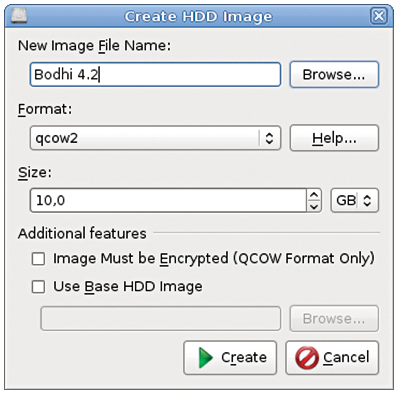 Figure 3: Creating an HDD image.
After you change all critical settings, close the dialog by clicking Apply. You can then launch the desired VM by clicking Start. Aqemu automatically adjusts the screen resolution. Additionally, it automatically starts the mouse cursor in most cases, so that you can easily switch between host and guest without the need to press any keyboard shortcuts.
To end a session, bring the Aqemu window to the foreground and click Stop. In a superposed dialog, the software will ask whether it should stop the VM. After confirming, Aqemu closes the window.
Snapshot
The KVM/Qemu virtualization environment lets you create a snapshot of a VM. A snapshot preserves a defined state of the VM, which lets you reconstruct the state in the event of a problem.
First, make sure that the VM is running when you create the snapshot, then select the Manage Snapshots option in the VM menu in the main window. In the dialog box that opens, click on +Create and enter a name and, optionally, a description for the snapshot. After a final click on OK, Aqemu creates the snapshot.
In the same window, you will see existing snapshots in the Snapshot List box and, if desired, you can activate a snapshot with Start.
« Previous 1 2 3 Next »
Buy this article as PDF
(incl. VAT)
Buy Linux Magazine
US / Canada
UK / Australia
Subscribe to our Linux Newsletters
Find Linux and Open Source Jobs
Subscribe to our ADMIN Newsletters
Support Our Work
Linux Magazine content is made possible with support from readers like you. Please consider contributing when you’ve found an article to be beneficial.

News
-
OSJH and LPI Release 2024 Open Source Pros Job Survey Results
See what open source professionals look for in a new role.
-
Proton 9.0-1 Released to Improve Gaming with Steam
The latest release of Proton 9 adds several improvements and fixes an issue that has been problematic for Linux users.
-
So Long Neofetch and Thanks for the Info
Today is a day that every Linux user who enjoys bragging about their system(s) will mourn, as Neofetch has come to an end.
-
Ubuntu 24.04 Comes with a “Flaw"
If you're thinking you might want to upgrade from your current Ubuntu release to the latest, there's something you might want to consider before doing so.
-
Canonical Releases Ubuntu 24.04
After a brief pause because of the XZ vulnerability, Ubuntu 24.04 is now available for install.
-
Linux Servers Targeted by Akira Ransomware
A group of bad actors who have already extorted $42 million have their sights set on the Linux platform.
-
TUXEDO Computers Unveils Linux Laptop Featuring AMD Ryzen CPU
This latest release is the first laptop to include the new CPU from Ryzen and Linux preinstalled.
-
XZ Gets the All-Clear
The back door xz vulnerability has been officially reverted for Fedora 40 and versions 38 and 39 were never affected.
-
Canonical Collaborates with Qualcomm on New Venture
This new joint effort is geared toward bringing Ubuntu and Ubuntu Core to Qualcomm-powered devices.
-
Kodi 21.0 Open-Source Entertainment Hub Released
After a year of development, the award-winning Kodi cross-platform, media center software is now available with many new additions and improvements.