
Smartphone-based two-factor authentication
Double Your Security

© Photo by Scott Webb on Unsplash
Protect your system from unwanted visitors with two-factor authentication.
If the only protection between an attacker and a user account is a password, security-conscious administrators start to get nervous – and rightly so. Although strong passwords can be enforced, carelessness cannot be ruled out. Two-factor authentication (2FA) provides additional protection against unwanted visitors, even if a user chooses a weak password. While the user's password remains as the first authentication factor, a six-digit numerical code with a limited validity period generated by a smartphone authenticator app adds a second factor.
In this article, I will show how to require a one-time code at login (in addition to the user's password) by creating an app on the user's smartphone. This procedure was developed by the Initiative For Open Authentication (OATH) and has been an Internet Engineering Task Force (IETF) standard since 2011.
Getting Started
For this article, I am using Ubuntu 20.04, but the procedure is very similar on other distributions. You have a Linux client and a server. On the server, which goes by the name of influx in this example, I have an account belonging to user bob. Bob has been logging in with a password only. However, his organization now wants to switch Bob's account to 2FA.
I'll start by installing the authentication module on Bob's client (Listing 1, line 1) and then log in as bob and start the module (line 2)
Listing 1
Installing Authentication Module
01 $ sudo apt install libpam-google-authenticator
02 $ google-authenticator
The module first prompts you to decide whether the authentication should be time-based. It wants to know if the identical time – in terms of Coordinated Universal Time (UTC) [1] – exists on the two systems involved (smartphone and computer console). Reply yes since all systems today use Network Time Protocol (NTP) to synchronize their time.
Next a QR code (Figure 1) appears, which you scan with a One-time password (OTP) app that you install on your smartphone; an OTP is only valid for a single use. There are plenty from which to choose; you can use any app that uses the Time-based One-time Password (TOTP) protocol. TOTP generates time-limited, one-time passwords based on the Hash-based Message Authentication Code (HMAC). For example, Google Authenticator is a very popular OTP app, although it is not open source.
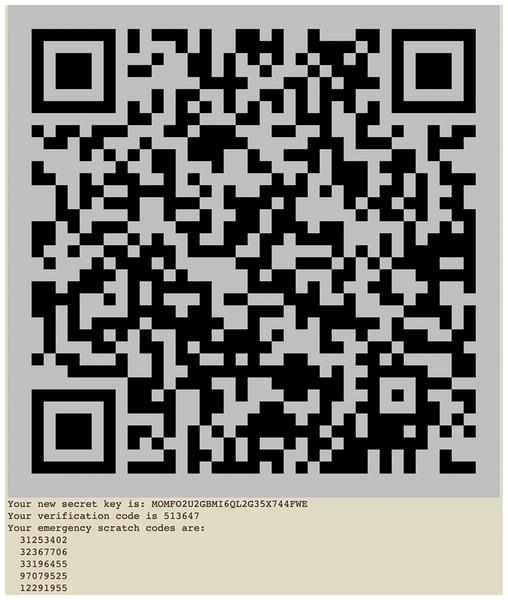 Figure 1: The QR code generated by Google Authenticator can be scanned using an OTP app like FreeOTP.
For this example, I will install the FreeOTP app developed by Red Hat, which is available for both iOS [2] and Android [3], on the smartphone (Figure 2). After you scan the code, a new button will appear in the app that lets you generate a one-time password on demand with a validity period of 30 seconds.
 Figure 2: Unlike Google Authenticator, Red Hat's FreeOTP is an open source application.
Now set aside the smartphone and return to the console. Below the QR Code in Figure 1, you will find a number of emergency scratch codes. If you lose your smartphone, you can still log in with these codes to generate a new QR code and start over. Each of the emergency scratch codes can only be used once. Keep these codes in a safe place.
Google Authenticator will now ask you a series of security questions, all of which you can safely answer with y (Figure 3). The idea is to limit the number of logins per time interval, but at the same time ensure a certain tolerance for time differences between client and server.
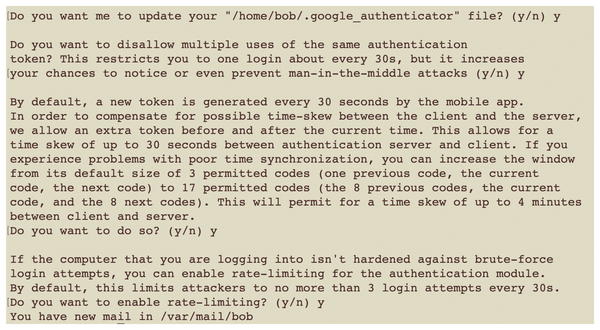 Figure 3: Yes (y) is the right response to all of Google Authenticator's questions.
You need to complete these steps for each user on the system who will be using 2FA. On the client side, all the work is done; time to work on the server.
Modifying PAM
To enable 2FA access, you need to modify two configuration files, for which you need root privileges.
First, modify the /etc/ssh/sshd_config file (Listing 2). Find the two lines that begin with UsePAM and ChallengeResponseAuthentication and make sure that both end with yes.
Listing 2
Modifying /etc/ssh/sshd_config
UsePAM yes
[...]
ChallengeResponseAuthentication yes
Next, edit the /etc/pam.d/sshd file, again working as root. After the @include common-auth line at the top of the file, add the following line:
auth required pam_google_authenticator.so
The file should now look like Listing 3.
Listing 3
Editing /etc/pam.d/sshd
[...]
@include common-auth
auth required pam_google_authenticator.so
[...]
Now type the command
systemctl restart ssh
to start the SSH service. At the next login attempt via SSH (Figure 4), the server now not only prompts for the user password (Password: in Figure 4), but also the one-time password (Verification Code:), which you generate with Google Authenticator.
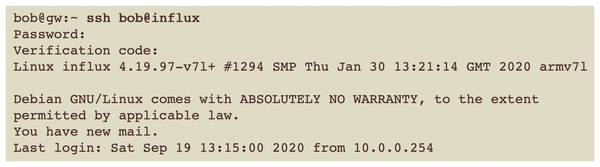 Figure 4: In addition to the user password (Password:), the login dialog now also prompts you for the one-time password (Verification Code:).
Console Login
My changes so far only apply to access via SSH. If you want to enable 2FA for the local login (the console) in addition to the remote login (the smartphone), you need to change the /etc/pam.d/login file (Listing 4).
Listing 4
Modifying /etc/pam.d/login
[...]
@include common-auth
session optional pam_motd.so noupdate
# insert this line:
auth required pam_google_authenticator.so
[...]
To do this, insert the following line
auth required pam_google_authenticator.so
after the @include common-auth line. The session optional pam_motd.so noupdate line is used to display notifications (Message of the Day); it is not available on all systems.
Buy this article as PDF
(incl. VAT)
Buy Linux Magazine
US / Canada
UK / Australia
Subscribe to our Linux Newsletters
Find Linux and Open Source Jobs
Subscribe to our ADMIN Newsletters
Support Our Work
Linux Magazine content is made possible with support from readers like you. Please consider contributing when you’ve found an article to be beneficial.

News
-
So Long Neofetch and Thanks for the Info
Today is a day that every Linux user who enjoys bragging about their system(s) will mourn, as Neofetch has come to an end.
-
Ubuntu 24.04 Comes with a “Flaw"
If you're thinking you might want to upgrade from your current Ubuntu release to the latest, there's something you might want to consider before doing so.
-
Canonical Releases Ubuntu 24.04
After a brief pause because of the XZ vulnerability, Ubuntu 24.04 is now available for install.
-
Linux Servers Targeted by Akira Ransomware
A group of bad actors who have already extorted $42 million have their sights set on the Linux platform.
-
TUXEDO Computers Unveils Linux Laptop Featuring AMD Ryzen CPU
This latest release is the first laptop to include the new CPU from Ryzen and Linux preinstalled.
-
XZ Gets the All-Clear
The back door xz vulnerability has been officially reverted for Fedora 40 and versions 38 and 39 were never affected.
-
Canonical Collaborates with Qualcomm on New Venture
This new joint effort is geared toward bringing Ubuntu and Ubuntu Core to Qualcomm-powered devices.
-
Kodi 21.0 Open-Source Entertainment Hub Released
After a year of development, the award-winning Kodi cross-platform, media center software is now available with many new additions and improvements.
-
Linux Usage Increases in Two Key Areas
If market share is your thing, you'll be happy to know that Linux is on the rise in two areas that, if they keep climbing, could have serious meaning for Linux's future.
-
Vulnerability Discovered in xz Libraries
An urgent alert for Fedora 40 has been posted and users should pay attention.