
Anonymity with ProxyChains
Secret Chain

© Lead Image © viesinsh, 123RF.com
If you want to stay anonymous on the web, you don't need the Tor browser or a Tor-based distro like Tails. ProxyChains obscures your presence through proxies – with or without Tor on the back end.
A number of scenarios lead to a need for online anonymity. You might wish to remain anonymous while working as a journalist in a war-torn country, for example, or when acting as a whistleblower. Perhaps you are working as a security researcher? Or maybe you just want some privacy from commercial Internet businesses. This article shows how to disguise Internet traffic using a tool called ProxyChains [1]. I came across ProxyChains while taking part in some challenges at the TryHackMe site [2].
If there are multiple links in a chain of proxies, it is very hard to perform digital forensics on a visiting IP address. Using a number of proxies to route traffic through before the traffic makes it back to your computer is a highly effective way of remaining anonymous online. If you think about it for a moment, though, not all protocols work in this scenario. For instance, traffic routed in this way typically requires the TCP transfer protocol. DNS also poses some challenges. DNS lookups use UDP instead of TCP. A common weakness with VPNs is that they leak DNS lookups to systems outside of the VPN. The trail of DNS lookups makes it possible for external systems to harvest traffic and determine what sites a user has been visiting.
ProxyChains manages to cleverly resolve DNS through proxies. You can use ProxyChains with many popular TCP-based client applications – including network scanners, mail clients, and web browsers. The versatile ProxyChains is capable of supporting SOCKS4, SOCKS5, and HTTP proxy servers and can even mix different proxy types in the same chain.
You might be surprised that such a potentially controversial piece of software is readily available in the Ubuntu Linux package repositories. The current version available on GitHub is Proxychains-4.3.0, with the last pull request merged when a patch was added around a year ago. And, according to the README page in the repository, if you can't find it using your favorite Linux distribution's package manager, all is not lost. ProxyChains is widely supported on other platforms too and is "…available with pkgsrc to everyone using it on Linux, NetBSD, FreeBSD, OpenBSD, DragonFlyBSD or Mac OS X."
The Ubuntu package repositories that are visible for ProxyChains appear in Figure 1. I used the following command to display the package repositories list:
$ apt search proxychains
 Figure 1: ProxyChains is available in the Ubuntu repositories.
Although the GitHub version was Proxychains-4.3.0, Ubuntu is currently offering proxychains4/jammy 4.16-1 for Ubuntu 22.04.2 LTS. The Ubuntu version is a respectable release that is supported for easy installation, but if you want to push for the very latest features, use the GitHub version and refer to the README for the common make install build instructions.
It should go without saying that the tools and information described in this article are purely for educational purposes and legal activities. If you work in the security field and defend systems against attacks, it can only help you in your defensive efforts to learn more about techniques used by attackers.
Routing with a Proxy List
The default behavior of ProxyChains is to route traffic through the Tor anonymity network. However, many users prefer to route directly through a predefined set of proxies on the conventional Internet. Defining the proxies directly has some benefits. For instance, you won't have to install the Tor service on your computer. Also, Tor can be problem as many online services detect and then actively deny traffic from the Tor network, as they are suspicious of a user's intent to route traffic through it.
The first step is to install the ProxyChains software and configure the .conf file to use a list of proxies. I have a couple of lists of free proxies to refer to and will make use of those. To install the package as the root user, use the following command, only a minuscule 145KB of disk space will be used up as a result:
$ apt install proxychains4 -y
This command will install the libproxychains4 and proxychains4 packages. You'll need 42.1KB for the archives and an additional 145KB of additional disk space.
The location of the configuration file is /etc/proxychains4.conf. In this case, I will use the dynamic chain mode, which is described in the config file comments as follows:
- Each connection will be done via chained proxies
- All proxies are chained in the order as they appear in the list
- At least one proxy must be online to play in the chain
- Dead proxies are skipped
I will uncomment the dynamic_chain line by removing the first character and then add a hash or pound sign to the line starting strict_chain in order to disable it. The comments explain that strict mode means that all proxies will be chained in exactly the order that they're listed and that all proxies must be online if you want to use the chain. You can also use the settings of the config file to affect the length of the chain, turn on quiet mode, enable a random chain, and change how ProxyChains handles DNS lookups.
ProxyChains offers some alternative approaches for how to perform anonymous DNS lookups. The proxy_dns setting is described as the fastest and easiest method to use: A thread is spawned that serves DNS requests and hands down an IP address assigned from an internal list (via remote_dns_subnet).
Look online for a really nice explanation of how DNS and ProxyChains work [3]. The post is about three years old, and the exact process might have evolved a little over time, but as you'll see in a moment, ProxyChains is able to cleverly use IP address ranges (such as the 224.x.x.x and 225.x.x.x ranges) in order to keep things private.
The proxy list section of the config file is shown in Listing 1. As you can see in Listing 1, the end of the file is where to add your list of proxies.
Listing 1
ProxyList Format
# ProxyList format
#       type  ip  port [user pass]
#       (values separated by 'tab' or 'blank')
#
#       only numeric ipv4 addresses are valid
#
#
#        Examples:
#
#             socks5  192.168.67.78   1080   lamer   secret
#             http    192.168.89.3    8080   justu   hidden
#             socks4  192.168.1.49    1080
#             http    192.168.39.93   8080
#
#
#       proxy types: http, socks4, socks5, raw
#         * raw: The traffic is simply forwarded to the proxy without modification.
#        ( auth types supported: "basic"-http  "user/pass"-socks )
#
[ProxyList]
# add proxy here ...
To create a list of proxies that I can test with, I'll visit the ProxyScrape website [4]. You can also find several GitHub repositories that update frequently to automate your proxy list [5]. Another source for proxies is the Free Proxy List site [6].
Websites like ProxyScrape offer free proxies to get you started. If you scroll down a little on their website, you'll find different types of proxies, including HTTP, SOCKS4, and SOCKS5. There's also a table of the countries, IP addresses, network ports, and latency. SOCKS5 supports authentication and other protocols. (See the Security Intelligence website for more on SOCKS5 [7].)
If you click one of the links above the list of proxies, you'll see a choice of options (Figure 2). I'll choose Socks5 Proxies. You can see the proxy lists were updated a few seconds ago, which is reassuring.
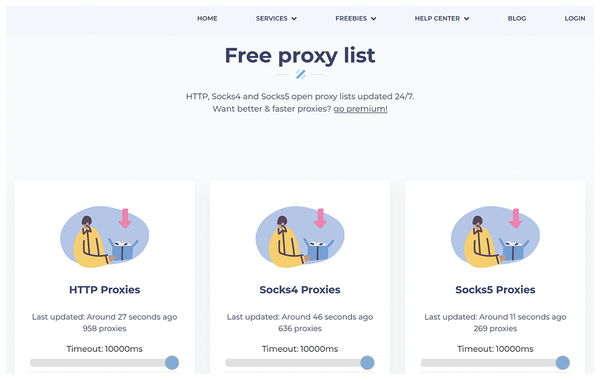 Figure 2: Use the link on the right side of the window to access the SOCKS5 proxy list in ProxyScrape.
Clicking on Socks5 Proxies reveals a long list of IP addresses and port numbers. I counted 271 proxies, which is both generous and impressive for a free service, even with the assumption that some of them will be offline when I try to use them.
As you can see in Listing 1, I can choose which type of proxies I will use: HTTP, SOCKS4, SOCKS5, and raw. I'll reduce it to the first three entries and add SOCKS5 to the front of line, so the format changes from: XXX.XXX.XXX.XXX:PORT (where the Xs are the octets in the IP address) to the following format:
SOCKS5 XXX.XXX.XXX.XXX PORT
Many of the proxies in the list have odd-looking port numbers, but their presence in the list assures that they are SOCKS5 proxies. Before editing the (now very long) configuration file, I make a backup copy to save any future headaches. Then I reduce the massive proxy list to just three proxies for testing. To match the format for a SOCK5 proxy, I add SOCKS5 to the start of each line in the proxy list and then replace the colon before the port number with a space.
Next I will comment out the following lines (by adding a hash symbol at the start of the line), which would have caused the traffic to route through the Tor network directly and not the list of proxies:
# defaults set to "tor"
# socks4        127.0.0.1 9050
I will run a cursory port scan test against the hostname scanme.nmap.org, a site that allows port scans if you stick with their acceptable usage [8].
Figure 3 shows what happens when you use the Telnet program via three proxies in a chain using the ProxyChains configuration. I've redacted the IP addresses. The command I used in Figure 3 was:
$ proxychains telnet scanme.nmap.org 80
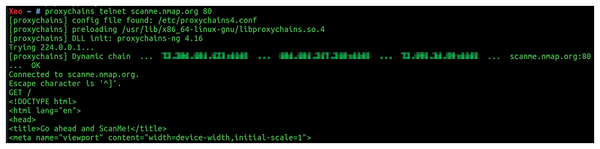 Figure 3: The three redacted SOCKS5 proxies in this chain worked like a treat.
In Figure 3, you can see three redacted IP addresses before the target hostname scanme.nmap.org. I have used the time-honored Telnet command GET / to request a web page. As you can see, the top of the abbreviated web page is then dutifully delivered to the command line.
This test shows that I can route traffic through multiple, chained proxies and receive traffic back successfully. ProxyChains is working beautifully.
Peeling Back The Onion
Tor is a remarkable, collaborative effort by the Internet community. The Tor network [9] routes traffic via user-supplied broadband connections, of which there are thousands globally, offering high levels of anonymity. I won't do it justice skimming over its features here, but you can read more about it online if you're new to Tor.
It's worth saying that you don't need ProxyChains to use the Tor network, but they play very nicely together. ProxyChains does not use the Tor browser – it simply uses the Tor service on the back end for establishing the chain of anonymous proxies. You'll find Tor in the Ubuntu repositories. Install it with:
$ apt-get install tor
In my case, the package manager installed version 0.4.6.10-1, and it comes in a little under 3MB. Start the tor.service unit file with:
$ systemctl start tor
If you plan to use Tor, you'll need to uncomment the lines commented out previously in the /etc/proxychains.conf file:
defaults set to "tor"
socks4  127.0.0.1 9050
In the previous test, I used Telnet on the command line. What about using an application with a user interface? Consider the venerable Firefox browser from Mozilla as an example. Before you try to use Firefox with ProxyChains and the Tor network, be sure your Firefox version is up to date:
$ snap refresh firefox
firefox 113.0.1-1 from Mozilla? refreshed
Next, I need to ensure that Firefox uses the specified ProxyChains proxy (which is the Tor network in this case). I'll use a popular extension for Firefox called FoxyProxy [10]. You might have used FoxyProxy to redirect traffic through Burp Suite [11] during Capture The Flag (CTF) exercises or while practicing ethical hacking.
To install FoxyProxy, start Firefox and select Add-ons and themes in the application menu. Figure 4 shows the blue Add to Firefox button on the add-ons page.
 Figure 4: It's a FoxyProxy extension for Firefox.
You are then confronted with a permissions pop-up dialog box (Figure 5). Click the Add button in order to continue.
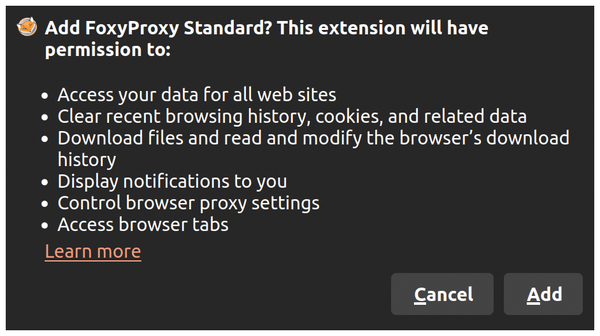 Figure 5: Permission to come aboard.
Once FoxyProxy is installed, look for the icon in the top-right corner of the browser to access the FoxyProxy settings. If you don't see the icon, you might have to rummage through the Firefox menus (Settings | Extensions & Themes) in order to open up the FoxyProxy settings. For future reference, if the icon is green, traffic is being routed via one of your preconfigured proxies. Figure 6 shows what happens when you click the little FoxyProxy icon.
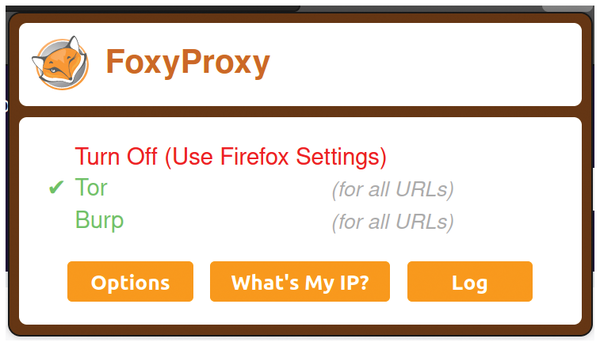 Figure 6: What you'll see when connected to ProxyChains and Tor.
If you haven't already set up Tor, click Options and you'll be presented with a screen listing choices for your settings on the right and then a number of menu options on the left. Click the Add link at the top-left. Figure 7 shows what to fill in.
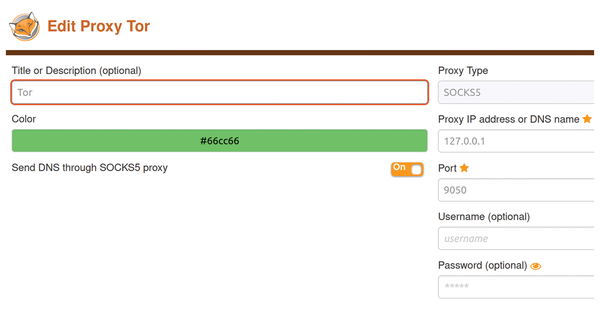 Figure 7: Where to add your Tor proxy settings in FoxyProxy.
The options are a name for the proxy, the IP address (127.0.0.1), and the port (TCP port 9050 in this instance). I also selected SOCKS5 in the pull-down menu. Note the Send DNS through SOCKS5 proxy setting is also enabled in Figure 7.
Once you have saved the settings, you should be able to tick the Tor line, shown in the Figure 6.
Interestingly, it looks like the Tor network configuration is accepting both SOCKS4 and SOCKS5 as the proxy type. To prove that all is well, I need to close all instances of Firefox and then open the application up again. In Figure 8, I can see what the website Whats My IP [12] shows when I visit.
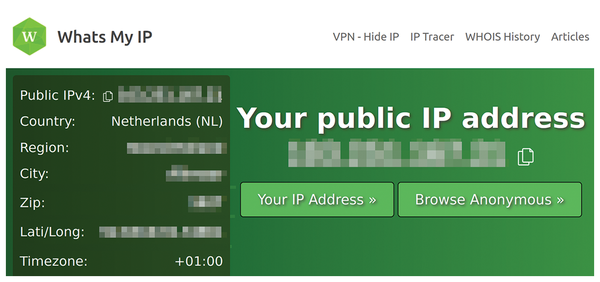 Figure 8: That's definitely not my IP Address.
In Figure 8, note the Netherlands IP Address (redacted to protect the innocent); that's not where I live! This test shows that network traffic is successfully routing via the Tor network.
ProxyChains with Nmap
Your Tor/ProxyChains network isn't limited to just forwarding browser traffic. ProxyChains works with many other popular applications. For instance, you can use ProxyChains with the mighty network mapper Nmap [13]. Install Nmap on Debian derivatives with:
$ apt install -y nmap
Try the following command with your ProxyChains and Tor configuration:
$ proxychains nmap -v -Pn -sT -p22,80,443 scanme.nmap.org
Loosely speaking, the -sT switch means run a TCP scan. See the Nmap website for more on the TCP Connect Scan option [14]. Abbreviated output of the command appears in Listing 2.
Listing 2
Routing Nmap with Tor/ProxyChains
Initiating Parallel DNS resolution of 1 host. at 14:07
Completed Parallel DNS resolution of 1 host. at 14:07, 0.04s elapsed
Initiating Connect Scan at 14:07
Scanning scanme.nmap.org (224.0.0.1) [3 ports]
[proxychains] Dynamic chain  ...  127.0.0.1:9050  ...  scanme.nmap.org:80  ...  OK
Discovered open port 80/tcp on 224.0.0.1
[proxychains] Dynamic chain  ...  127.0.0.1:9050  ...  scanme.nmap.org:443 <--denied
[proxychains] Dynamic chain  ...  127.0.0.1:9050  ...  scanme.nmap.org:22  ...  OK
Discovered open port 22/tcp on 224.0.0.1
Completed Connect Scan at 14:07, 1.19s elapsed (3 total ports)
Nmap scan report for scanme.nmap.org (224.0.0.1)
Host is up (0.36s latency).
rDNS record for 224.0.0.1: all-systems.mcast.net
PORT    STATE  SERVICE
22/tcp  open   ssh
80/tcp  open   http
443/tcp closed https
Read data files from: /usr/bin/../share/nmap
Nmap done: 1 IP address (1 host up) scanned in 1.27 seconds
The output in Listing 2 demonstrates that I have asked Nmap to scan three network ports on the target system. The denied response for TCP port 443 is not actually because Tor is rejecting the routing or failing to route the traffic but is because the destination port is closed to traffic and there's nothing to report back. The other two ports are open, and you can see an OK entry for each.
In addition to Nmap, you could run the Telnet command through ProxyChains to query ports and not just the web page, as shown in Listing 3.
Listing 3
Telnet Via ProxyChains
$ proxychains telnet scanme.nmap.org 22
[proxychains] config file found: /etc/proxychains4.conf
[proxychains] preloading /usr/lib/x86_64-linux-gnu/libproxychains.so.4
[proxychains] DLL init: proxychains-ng 4.16
Trying 224.0.0.1...
[proxychains] Dynamic chain  ...  127.0.0.1:9050  ...  scanme.nmap.org:22  ...  OK
Connected to scanme.nmap.org.
Escape character is '^]'.
SSH-2.0-OpenSSH_6.6.1p1 Ubuntu-2ubuntu2.13
Or if you just want to SSH to another host via the Tor network or a chain of proxies, you can use the command in Listing 4.
Listing 4
SSH Through Proxies
$ ssh -v -D 127.0.0.1:9050 scanme.nmap.org -p22
[...snip?]
debug1: /etc/ssh/ssh_config line 21: Applying options for *
debug1: Connecting to scanme.nmap.org [45.33.32.156] port 22.
debug1: Connection established.
[...snip?]
root@scanme.nmap.org's password:
Buy this article as PDF
(incl. VAT)
Buy Linux Magazine
US / Canada
UK / Australia
Subscribe to our Linux Newsletters
Find Linux and Open Source Jobs
Subscribe to our ADMIN Newsletters
Support Our Work
Linux Magazine content is made possible with support from readers like you. Please consider contributing when you’ve found an article to be beneficial.

News
-
Canonical Releases Ubuntu 24.04
After a brief pause because of the XZ vulnerability, Ubuntu 24.04 is now available for install.
-
Linux Servers Targeted by Akira Ransomware
A group of bad actors who have already extorted $42 million have their sights set on the Linux platform.
-
TUXEDO Computers Unveils Linux Laptop Featuring AMD Ryzen CPU
This latest release is the first laptop to include the new CPU from Ryzen and Linux preinstalled.
-
XZ Gets the All-Clear
The back door xz vulnerability has been officially reverted for Fedora 40 and versions 38 and 39 were never affected.
-
Canonical Collaborates with Qualcomm on New Venture
This new joint effort is geared toward bringing Ubuntu and Ubuntu Core to Qualcomm-powered devices.
-
Kodi 21.0 Open-Source Entertainment Hub Released
After a year of development, the award-winning Kodi cross-platform, media center software is now available with many new additions and improvements.
-
Linux Usage Increases in Two Key Areas
If market share is your thing, you'll be happy to know that Linux is on the rise in two areas that, if they keep climbing, could have serious meaning for Linux's future.
-
Vulnerability Discovered in xz Libraries
An urgent alert for Fedora 40 has been posted and users should pay attention.
-
Canonical Bumps LTS Support to 12 years
If you're worried that your Ubuntu LTS release won't be supported long enough to last, Canonical has a surprise for you in the form of 12 years of security coverage.
-
Fedora 40 Beta Released Soon
With the official release of Fedora 40 coming in April, it's almost time to download the beta and see what's new.