
Creating a graphical Python app with CardStock
The Dealer

© Lead Image by Unsplash Amol Tyagi
CardStock provides a simple development environment for building a Python graphical application.
CardStock [1] is a multiplatform software development tool inspired by Apple's HyperCard. CardStock's simple design greatly facilitates building graphical Python programs that can run either on your desktop or online as a web application (Figure 1). You can use CardStock to augment your applications with text, graphics, images, buttons, text entry fields, and Web Views. You can even play sounds and add clip art. In this article, I explain how to install CardStock on Linux, how it works, and how to get started.
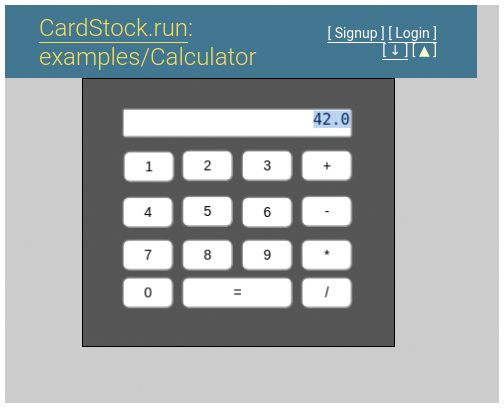 Figure 1: This calculator is just one of the many CardStock programs you can run on www.cardstock.run.
Installing CardStock
The easiest way to install CardStock on any Linux distribution involves a two-step process. First, install the libasound and libwebkit2gtk development libraries from your distribution's native repositories. Second, install CardStock with pip, Python's package manager. On Ubuntu 22.04, installation looks like this:
sudo apt install libasound2-dev libwebkit2gtk-4.0-dev
pip3 install cardstock
The CardStock manual warns that the second step, which also installs the wxPython graphical toolkit, "can take a very long time to build." In my case, pip took about 20 minutes to install wxPython on a computer with an i5 CPU running at 1.6GHz and 16GBs of RAM.
When pip finished, I found two executable files called cardstock and csviewer installed in $HOME/.local/bin. The cardstock file, the development environment shown in the figures for this article, saves your Cardstock programs as one file with a .cds extension. The other file, csviewer, is the interpreter that will actually load and execute those files when you want to use them. Assuming you saved your CardStock program as myprogram.cds, you can run the program by either typing
csviewer myprogram.cds
at the prompt or defining csviewer as the handler of .cds files in your file manager or desktop environment.
The CardStock Stack Designer
Both visually and structurally, CardStocks programs are stacks of cards that run one at a time, each with its own user interface. Each stack can contain multiple graphical objects and custom Python code.
You build your stack in the Designer (Figure 2), CardStock's graphical interface. In the Designer, the left panel is where you add cards and fill the cards with objects. The right panel hosts a property editor (top) and a code editor (bottom), where you can see and edit all of the current object's properties.
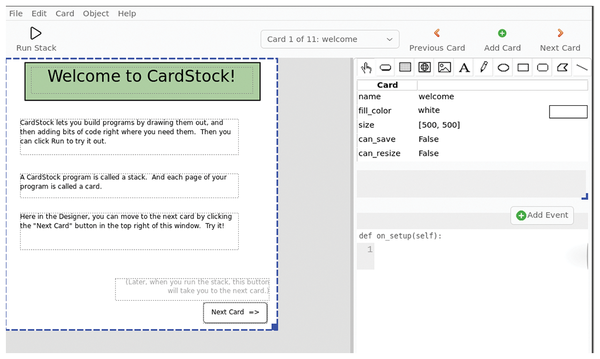 Figure 2: The Designer's default configuration, plus a demo.
In the property editor top right, the leftmost button in the toolbar is the object selector (called the hand tool in CardStock's documentation). The hand tool lets you select, resize, drag, and drop objects on a card.
The other buttons in the property editor toolbar add graphical elements, all controllable with Python code. In addition to basic geometric figures, CardStock supports several types of clickable buttons as well as text entry fields, Web Views (more on this later), images, and text labels. The pencil button in the middle lets you draw freehand.
All in all, the Designer is quite easy to use. Until you get to actual coding, building software programs with CardStock feels a lot like creating a slideshow with LibreOffice Impress or similar programs. All of the objects are blocks of software code, but you can add objects to a card and then delete, move, resize, align, and group them, similar to an Impress slide. The main difference between Impress and CardStock is that each card and object must have a meaningful, unique name. If you don't do this, CardStock will assign obscure strings to each component, making your stack harder to document and debug.
You can drag and drop objects, change their style (e.g., with or without visible borders), and then adjust their position by one or more pixels at a time by moving them while you press the Shift or Alt keys. If necessary, you can even distribute objects in several overlapping layers, with the exception of text fields and Web Views, which must stay in the topmost layer.
The Code Editor
What makes CardStock really useful is how easy it is to attach event-driven Python code to any stack component. You do this in the Designer's code editor (shown in Figures 3 and 4, bottom right).
Compared to heavyweights like Emacs, vi, or Kate, the CardStock editor is pretty basic. However, it has all the basic functions: keyword suggestions and autocomplete, syntax highlighting, error highlighting, and Python regular expressions to find and replace text. CardStock also has a help function that shows information about the most recently selected property or event.
Whenever you create an object, or select an existing one, clicking on the + Add Event button in the code editor shows all the events applicable to that object. After selecting an event, you can enter the code that describes what should happen to the object whenever that event happens.
In Figure 3, I first clicked on the Image button (fifth from the left) to add a screenshot of the Linux Magazine home page and then rotated it 45 degrees counter-clockwise (shown as 315 – that is 360 minus 45 – for the image's rotation property).
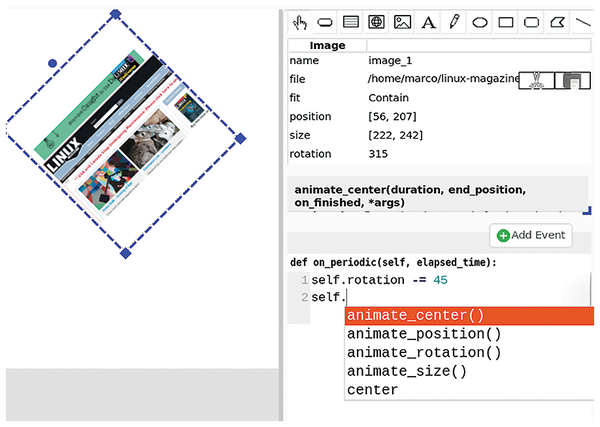 Figure 3: You set each object's initial properties in the property editor (upper right). Behavior during execution is controlled by events defined in the code editor (bottom right).
Then, I clicked on + Add Event (for a description of the main CardStock events, see the "CardStock Events" box), selected on_periodic, and inserted code that tells the image to rotate 45 degrees clockwise, around its center, every time the event happens (i.e., about 30 times per second). As shown in Figure 3, the code editor prompts you with the events that can be applied to the current object via a context menu.
CardStock Events
CardStock supports lots of events. Some events are at the stack level. For example, on_resize() makes the stack redraw itself when you resize its window. Other events only involve single cards or single objects.
Due to space contraints, I've provided a few examples for each category (for the entire list, see the CardStock Reference guide [2], included in the official wiki [3]).
The on_setup() event applies to both cards and objects. It lets you set the initial value of every variable available for the stack or objects. I recommend using this event to avoid unpredictable behavior.
The on_show_card(self) event describes what happens as soon a card is shown (see Figure 4 for an example). Its counterpart, on_hide_card(), does the exact opposite.
The on_periodic() event happens inside every object or card, approximately 30 times per second (see Figure 5). Use this event for any check or code that must run continuously.
The on_message() and broadcast_message() events make their recipients execute the code they contain. With on_message(), the code only applies to the object it is attached to. You call it, for example, by writing OBJECT_NAME.send_message(). As its name implies, broadcast_message() goes to all of the components in the stack.
At a lower level, on_click() describes what happens when you click on an object, while on_mouse_enter(), on_mouse_exit(), and on_mouse_move() run when the cursor enters, leaves, or moves inside an object without clicking any button. To make something happen when you press the main mouse button inside an object, use on_mouse_press() or on_mouse_release().
CardStock also can run code in response to key presses, with events like on_key_press(self, key_name) or on_key_hold(). Like on_periodic, these events are called approximately 30 times per second, for every key that remains pressed.
Next, using the hand tool to select it, I went back to configure the card. I changed its fill_color to yellow (Figure 4) in the property editor. In the code editor, I also defined the on_show_card(self) event to tell the CardStock viewer to wait three seconds every time that card is shown and then automatically move to the next card. Figure 4 also introduces what's probably the most ubiquitous variable in CardStock: self. The self variable basically means that the code that follows applies to the same object that triggers the current event.
 Figure 4: CardStock treats cards and objects in the same way: You define their properties in the property editor and their events in the code editor.
Figure 5 shows the results of the code from Figures 3 and 4: The card that is running in the CardStock viewer is captured during continuous rotation with the image upside down.
 Figure 5: The CardStock card viewer executes the programs created with the Designer. Notice how the screenshot has rotated in respect to its initial position.
CardStock also lets you move and animate objects in more complex ways. The command
object.animate_center(3, [400,100])
moves the object from its current position and centers it at the coordinates 400 and 100 (in pixels) on the object's card, taking three seconds to complete the action.
Another way to move objects is to assign speed, in pixels per second, along the X and Y axes of the object's card, and set both values to 0 when the object must stop:
object.speed=[0,30]
object.speed=[0,0]
You can also change the speed on each axis automatically by adding statements to an object's on_periodic() event as follows:
self.speed.y -= 30
Other object properties can also be animated. For instance, to gradually change, over two seconds, the background of a card from its current color to red, you would use
card.animate_fill_color(2, 'red')
You can control the execution of these or any other animations by attaching them to an event. For example, associating the command above with an on_mouse_enter event would cause the card to change to red whenever a mouse pointer enters the current object.
When doing this, keep in mind that different animations happen simultaneously, while commands of the same type are executed sequentially. To end all of an object's animations, use the object.stop_animating() event.
If you are interested in text processing, you can use CardStock to build data entry forms. While these forms are not visually appealing, they are very practical and easy to assemble (Figures 6 and 7).
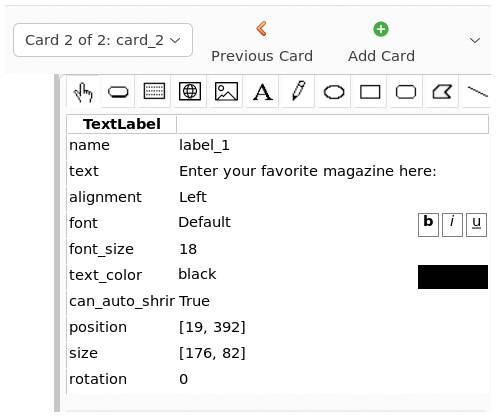 Figure 6: You can control almost every parameter of a CardStock text label.
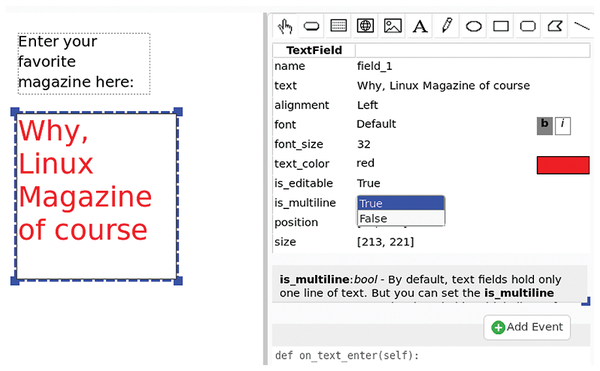 Figure 7: A CardStock text entry field, placed below the label defined in Figure 6, with a default value.
Buy this article as PDF
(incl. VAT)
Buy Linux Magazine
US / Canada
UK / Australia
Subscribe to our Linux Newsletters
Find Linux and Open Source Jobs
Subscribe to our ADMIN Newsletters
Support Our Work
Linux Magazine content is made possible with support from readers like you. Please consider contributing when you’ve found an article to be beneficial.

News
-
Canonical Releases Ubuntu 24.04
After a brief pause because of the XZ vulnerability, Ubuntu 24.04 is now available for install.
-
Linux Servers Targeted by Akira Ransomware
A group of bad actors who have already extorted $42 million have their sights set on the Linux platform.
-
TUXEDO Computers Unveils Linux Laptop Featuring AMD Ryzen CPU
This latest release is the first laptop to include the new CPU from Ryzen and Linux preinstalled.
-
XZ Gets the All-Clear
The back door xz vulnerability has been officially reverted for Fedora 40 and versions 38 and 39 were never affected.
-
Canonical Collaborates with Qualcomm on New Venture
This new joint effort is geared toward bringing Ubuntu and Ubuntu Core to Qualcomm-powered devices.
-
Kodi 21.0 Open-Source Entertainment Hub Released
After a year of development, the award-winning Kodi cross-platform, media center software is now available with many new additions and improvements.
-
Linux Usage Increases in Two Key Areas
If market share is your thing, you'll be happy to know that Linux is on the rise in two areas that, if they keep climbing, could have serious meaning for Linux's future.
-
Vulnerability Discovered in xz Libraries
An urgent alert for Fedora 40 has been posted and users should pay attention.
-
Canonical Bumps LTS Support to 12 years
If you're worried that your Ubuntu LTS release won't be supported long enough to last, Canonical has a surprise for you in the form of 12 years of security coverage.
-
Fedora 40 Beta Released Soon
With the official release of Fedora 40 coming in April, it's almost time to download the beta and see what's new.