
Remote Control
Controlling PCs with an Android smartphone
ByDid you leave your system running? Did you forget to start a critical backup? Control your Linux computer from anywhere with an Android phone.
The combination of a Linux computer and an Android smartphone opens up a world of options for interaction. For example, the Gmote app lets you use your smartphone to control media files on your PC. Another useful app that follows the same client-server principle is Remote Launcher.
Remote Launcher lets you launch programs on a Linux PC from your Android smartphone with a single click (Figure 1).
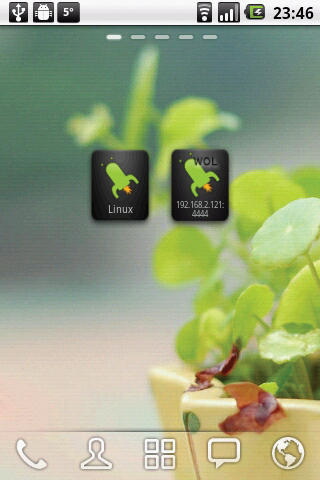 Figure 1: Widgets are available for fast access. The one on the left shows you the launchers that exist on the PC you are connected to, and the one on the right executes the Wake on LAN function.
Assuming you have the correct settings, you can even boot up or shut down your PC from on the road. The app on the smartphone acts as a client that controls a small server program on the PC. Remote Launcher also comes with a collection of widgets and shortcuts that accelerate the process of launching PC programs.
With a little creativity, you can imagine any number of new scenarios for Remote Launcher. For example, you could use an additional app to launch smartphone functions based on your location – for example, to boot your PC automatically when you come home. Additionally, you could launch any kind of Linux application, including a script you wrote yourself to start a backup.
App and Server
Remote Launcher is available from the Play Store, as the Android Market is now called. As is so often the case, the app is available in two variants: as a free version with ads and as an ad-free version for US$ 0.77. The Remote Launcher app requires at least Android 1.6 “Donut,” uses only 75KB of RAM, and requires only a minimum set of permissions: Besides unrestricted access to the Internet, the app wants to control the vibration alarm and display the network status.
Remote Launcher includes a client app on the Android device and a server component on the computer you want to control. According to the Play Store site, “The Remote Launcher server is written in Java so it should work on any PC with the Java Runtime Environment installed (version 1.6 or later), be it Linux, Windows or Mac OS. It has been tested on Ubuntu and Windows 7.”
In this article, I will set up Remote Launcher to control a Linux system. Java is included by default with most major Linux distributions; if necessary, you can type java -version to discover which version is running on your computer. The server component of Remote Launcher is available as an installation script from the project website. After downloading, unpack the tarball with:
$ tar -xf remotelauncherserver-0.2.11.tar.gz
Then, change to the directory created by the step, become root, and launch the install.sh script. This sets up the server under /usr/share/ and creates a matching symlink for the call in /usr/bin. Finally, you need to enable the tool by calling remote-launcher-server.
The Remote Launcher server welcomes you with a note saying that you need to set a password. After confirming by pressing OK, you are taken to a dialog where you can enter a new password and then confirm in the normal way in a separate field. Just ignore the grayed field for your previous password – after all, you didn’t assign one.
When launched, Remote Launcher comes up with a program window and then drops a matching icon into your system panel. Most of the program window is taken up by the Server log (Figure 2), where Remote Launcher logs all activities. When launched, the last message will be Waiting for client to connect on port 4444.
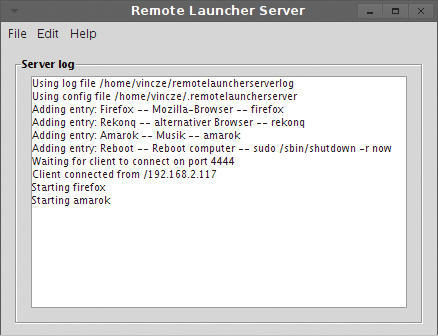 Figure 2: The program window on the Linux PC shows you Remote Launcher’s latest actions.
Next, you need to configure the app to allow it to open a connection to the server on a Linux PC. Make sure the Android device is connected to your home network via wireless LAN and then launch the Remote Launcher app. In the app, click on Add. The first entry you need to make is the IP address of the PC (Figure 3).
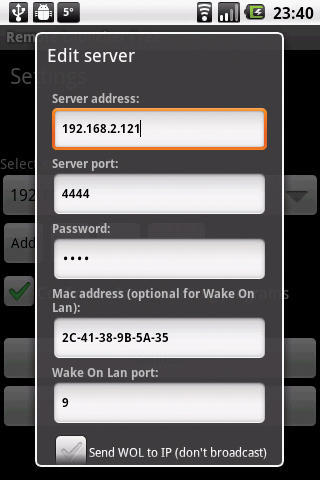 Figure 3: In this dialog, you add your PC, or the server installed on it. In the bottom half, you can set up Wake on LAN.
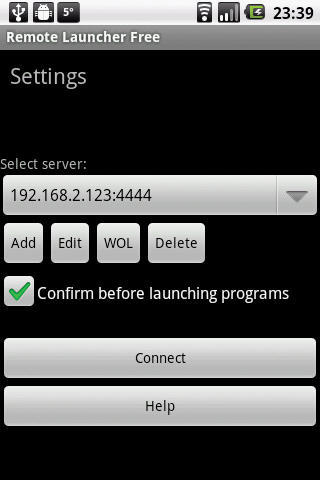 Figure 4: The app is straightforward. You can execute the Wake on LAN function by pressing the WOL button.
If you don’t know the IP address, go to the PC’s console and type ifconfig. The output below, say, eth0 will give you information about the network interface, including the IP address (inet address). You need to enter this address on the Android device as the Server address.
Keep the default value for the server port, 4444 – unless you have already configured a different port for the server on your PC. You now need to enter the password you configured on the server earlier. You can ignore the other input boxes for the time being. Now click Save to finish.
As an initial test, try dialing up the server. Clicking on Connect connects the app with the PC and returns a success message if this works (Figure 4).
Because you don’t have a launcher configured on the computer, you can’t actually do anything yet. On the PC side, the server makes a note of the open connection in the log with a line to the effect Client connected from /192.168.2.117, stating the IP address of the connected Android device (see the “Tip” box).
Configuring Launchers
To use the app to launch applications on your PC, you first must configure the launchers. To do so, go to the Remote Launcher server program window and select Edit | Configure Launchers or press the keyboard shortcut, Alt+L. In the dialog that then appears (Configure launchers), click on Add launcher.
In the dialog, type an intuitive name for the launcher in the Name box. Then, add a Description of the function you will be controlling in the next box. Path lets you define the path to the file to be executed. But, it is typically sufficient to simply type the name of the program file, such as amarok, for the Amarok player. Next, save these details by pressing Add.
After closing the dialogs for creating launchers (Figure 5), and saving all of your settings, you can select the desired launcher on your Android phone.
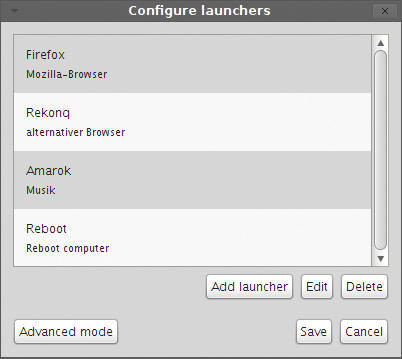 Figure 5: These launchers are available in the app after you create them.
The app will prompt you to decide whether you really want to execute the launcher. When you confirm, it will launch the corresponding application on your Linux computer.
Don’t be surprised if the app attempts to reconnect to the server after the Android device has been in standby mode. Depending on the power-saving options for your device, the wireless LAN function could be automatically disabled in standby. You should leave this option, because it helps avoid unnecessary stress on your battery.
Sophistication
You can use Remote Launcher to shut down the computer or trigger a reboot remotely. To do so, you need to configure special launchers on the basis of prebuilt templates.
Go to the corresponding dialog by selecting Edit | Configure Launchers and click on Add launcher. Below Template, you will find preconfigured settings such as Shutdown (Figure 6) or Reboot.
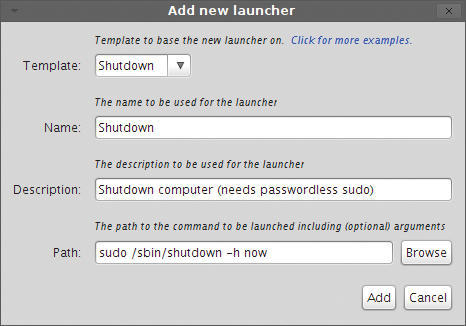 Figure 6: Remote Launcher provides templates that help you configure special features, such as remote shutdown.
After selecting one of these templates, simply confirm the dialog by pressing OK.
Remote Launcher uses the shutdown command, which requires root access, for both of these features. Thus, you need to modify the /etc/sudoers file on your PC to use both functions in the app. For this step, you should avoid using a normal editor because you might produce a syntax error that prevents you from running sudo. For Linux systems, on which the root doesn’t have a password, you would lock yourself out and not be able to run any administrative tasks.
To modify the sudo configuration file, you should instead run the sudo visudo command in a console. This command opens an editor, which ensures that you observe certain syntax rules. Next, navigate to the end of the file and add the following:
%Use ALL = NOPASSWD: /sbin/shutdown
Replace User with your own username. Save the file and quit the editor. Now, User can execute the shutdown command without having to enter a password for sudo. This means the app can run this command via your Android device.
Wake Up!
If your PC has a network interface that supports Wake on LAN, you can remotely wake up your PC via the app. To do so, the Remote Launcher app sends a magic packet that directly enables this function. You will need to enable Wake on LAN in your PC’s BIOS for this to work; and you may need to perform some additional configuration steps on Linux.
To use Wake on LAN with the Remote Launcher app, select the appropriate connection on your Android device and then click Edit. In the Mac address field, type the MAC address for your PC’s network card.
You can use this unique hardware address to address the network card without the IP. To discover the MAC address on your PC, type ifconfig at the command line and read the value below Hardware Address.
On the Road
Your home network is not the limit for Remote Launcher. You can also use the app on the road – for example, to boot your PC before you get back home. This feature removes the need to start up manually.
To do this, you need to set up port forwarding on your home router. The approach here differs from router to router, but the main steps will be the same. To begin, use a browser to access your router’s configuration interface by typing the router’s IP address in the address bar. After logging in to the device, look for the port rule settings in the network settings. The online help or the router manual will help you here.
Next, define a new rule for the IP address of the PC you will be controlling remotely using the TCP protocol and a port number – for example, 7778. The Remote Launcher app sends the commands to this port. The router accepts the request and forwards it to the Remote Launcher port on the PC (4444), which you also need to specify. The Remote Launcher server listens for commands on this port, and your router acts as a forwarding node.

On the Android device, you now create a new profile because you can’t access the PC’s IP address via the cellular network; however, you can access the router’s WAN IP address. When you specify the port (in this example, 7778), the router knows that it has to forward the incoming signal to the app on the PC. You will find the router’s WAN IP address in the configuration interface. For Telekom SpeedPORT routers, for example, this will be the Overview menu: Public WAN-IP.
With this information, you can now click on Add again in the app. Enter your router’s WAN IP address in Server address and enter the port number you defined in your router’s rules (again, 7778) for Server port. The password below Password is the same as usual. Then, copy the MAC address for the PC that you want to wake up into the Mac address field and click on Add.
For the initial test, you need to disable the WLAN connection on your Android device and enable the Internet connection. Select the router entry from the Remote Launcher app selection list and then click on Connect. You will see the configured launcher entries for the Remote Launcher server, and you can wake up the PC and launch programs in the normal way.
Conclusions
Remote Launcher gives you versatile options for remotely controlling a Linux PC via a smartphone or tablet on Android. Leveraging the Wake on LAN function in particular will save you many a journey if you forgot to shut down your PC before leaving home.
Subscribe to our Linux Newsletters
Find Linux and Open Source Jobs
Subscribe to our ADMIN Newsletters
Support Our Work
Linux Magazine content is made possible with support from readers like you. Please consider contributing when you’ve found an article to be beneficial.

News
-
Container-Based Fedora Hummingbird Designed for Agent-First Builders
Fedora Hummingbird brings the same approach to the host OS as it does to containers to level up security.
-
Linux kernel Developers Considering a Kill Switch
With the rise of Linux vulnerabilities, the kernel developers are now considering adding a component that could help temporarily mitigate against them… in the form of a kill switch.
-
Fedora 44 Now Gaming Ready
The latest version of Fedora has been released with gaming support.
-
Manjaro 26.1 Preview Unveils New Features
The latest Manjaro 26.1 preview has been released with new desktop versions, a new kernel, and more.
-
Microsoft Issues Warning About Linux Vulnerability
The company behind Windows has released information about a flaw that affects millions of Linux systems.
-
Is AI Coming to Your Ubuntu Desktop?
According to the VP of Engineering at Canonical, AI could soon be added to the Ubuntu desktop distribution.
-
Framework Laptop 13 Pro Competes with the Best
Framework has released what might be considered the MacBook of Linux devices.
-
The Latest CachyOS Features Supercharged Kernel
The latest release of CachyOS brings with it an enhanced version of the latest Linux kernel.
-
Kernel 7.0 Is a Bit More Rusty
Linux kernel 7.0 has been released for general availability, with Rust finally getting its due.
-
France Says "Au Revoir" to Microsoft
In a move that should surprise no one, France announced plans to reduce its reliance on US technology, and Microsoft Windows is the first to get the boot.