
Detecting intruders with a Raspberry Pi IDS
Smoke Alarm

Lead Image © Akaratee Nithipanmangkorn, 123RF.com
An intrusion detection system was once considered too complicated and too expensive for a home network, but nowadays you can use a Raspberry Pi and the Suricata IDS for real-time notice of an incoming attack.
An intrusion detection system (IDS) works like a smoke detector. It detects a risk, issues a warning, but does not take any further steps to prevent the attack. A full-blown intrusion prevention system (IPS), on the other hand, can take additional steps to stop the attack. However, an IPS is much more elaborate (and often expensive), and it is often overkill for a small home network. For many users on small networks, the notification is the most important part, and an IDS can deliver that notification for far less trouble and a smaller learning curve.
An IDS takes a deep look at the IP packets passing through. If the analyzed content appears suspicious, the system alerts the user. The IDS references a database populated with known attack patterns to decide whether or not a packet contains a possible attack. This makes it similar to a virus scanner, which examines data and compares the data against known patterns.
An IDS is part of the standard equipment at any data center today. At a modern data center, a fast appliance fields data streams from all servers via a multi-gigabit network interface card and reports its discoveries to the network operations team. This might sound like an expensive solution, but the technology can just as easily be applied to home networks. This article describes how to set up a simple Raspberry Pi or comparable single-board system to act as an IDS. The downsized IDS receives a copy of the incoming packets from the router. You'll need a router that is capable of capturing and forwarding incoming packets to the Rasp Pi for monitoring purposes. Some routers might include this feature directly. In other cases, you can set up forwarding on the router if it comes with Bash scripting support. The examples in this article are based on a Fritz!Box 7583 router.
Like many Rasp Pi scenarios, the setup presented in this article is more of a life hack than an industrial-strength solution, but it does the job. When you're finished configuring it, you might find that you know a little more about IDS systems and how they work. One note to keep in mind: You are asking the router to take on additional tasks, which might slow it down, depending on the make and model, but in a low-traffic setting like a home network, you might not notice the difference.
Equipment
The IDS needs compute power for its investigations. You will want to use at least a Raspberry Pi 3B+, or preferably a fourth-generation Rasp Pi model. If you want to try some another mini PC, you'll need at least 1GB RAM and a dual-core CPU. A recent Raspberry Pi OS or Debian without a graphical user interface is fine as the operating system.
After installing Raspberry Pi OS, the Raspberry Pi no longer needs a local console. You can configure it via SSH. As for the choice of software: Make sure you reduce the power and flash requirements. A 500MB IDS logfile will slow the system down and make it almost unusable. Elasticsearch might be the right choice of back end for large installations, but a lightweight SQLite database is better suited for a Rasp Pi IDS.
Suricata
Suricata [1] is an open source IDS tool that will serve as the foundation for this Rasp Pi IDS. Suricata listens on a network adapter and compares the IP packets passing through with its signature database. If the examined packet matches a signature, Suricata responds with the defined action, which could be, say, firing off an alert. This analysis depends heavily on the quality of the signatures.
You first need to install the Suricata software on the Rasp Pi (Listing 1, line 1). The repository contains a recent version, which is fine for your home IDS. One special thing about Suricata is that it does not reference the physical network adapter eth0 but the virtual adapter ids0 (line 2). The update command (line 4) fetches the free signatures – this can take a few minutes depending on the speed of your Internet connection. As an example, loading and testing 43,000 rules on a Raspberry Pi 3B+ took about three minutes.
Listing 1
Install and Update Suricata
01 # apt install suricata
02 # sed -i -e 's/interface: eth0/interface: ids0/' /etc/suricata/suricata.yaml
03 # ln -s /var/lib/suricata/rules/suricata.rules /etc/suricata/rules/
04 # suricata-update
05 # systemctl stop suricata
06 [... see Listing 2 ...]
07 # suricata -c /etc/suricata/suricata.yaml -i ids0 -v
08 # systemctl start suricata
Listing 2
Setting up a Dummy Interface
# nmcli con add type dummy ifname ids0 ipv4.method disabled ipv6.method disabled
# systemctl enable NetworkManager
# systemctl start NetworkManager
Then stop Suricata for the time being (line 5). When first launched in a live scenario, Surricata has to wait until the commands in Listing 2 have fired up the ids0 interface – but more on that later. Once this is complete, you need to restart Suricata manually (Listing 1, lines 7 and 8). Suricata then sniffs the packets from the ids0 interface and checks them against the enabled signatures. If one of the rules matches, an entry is added to the eve.json file – again, more on that later. If you see any error messages at system startup, it makes sense to use the verbose option -v.
You will need to be patient, because it can take up to two minutes for Suricata to load the signatures. The application logfile is available in /var/log/suricata/.
Workflow
The Rasp Pi system will need some way of reading the packets that pass through the router. Some routers have a mirror port that creates copies of packets and forwards them via a different LAN port to a server for analysis. If your router does not have this feature (and many home routers don't), the Rasp Pi IDS will need to request the data. In the case of my Fritz!Box router (Figure 1), all it takes is Wget and some Bash wizardry. Note that it usually doesn't work to cache the collected packets (that would kill off the SD card relatively quickly). The goal is instead to feed the data to the IDS process.
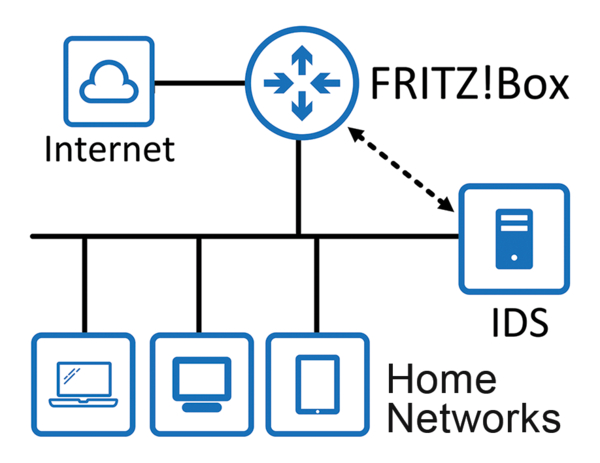 Figure 1: The Rasp Pi resides on the home network and gets the copies of all IP packets from the Fritz!Box.
Unfortunately, pipe magic is not going to help here. Suricata stops working if there is no data flow through the pipe (i.e., whenever the Fritz!Box is idle). The solution is a dummy network adapter that behaves like a second loopback interface. More specifically, Wget fetches PCAP files from the Fritz!Box and sends the IP packets they contain to the dummy interface. Suricata listens to this dummy NIC, which means that it receives a copy of all the packets that flow through your Internet connection. Suricata rummages through the packages for suspicious content. Detouring via the dummy interface offers the advantage that more analysis tools can be added without making any changes (e.g., Tcpdump).
Suricata saves its results as a text file in JSON format. The graphical processing is handled by EveBox [2]. The EveBox tool disassembles the JSON lines, extracts the essential content, and serves everything up as a fancy web page.
Buy this article as PDF
(incl. VAT)
Buy Linux Magazine
Subscribe to our Linux Newsletters
Find Linux and Open Source Jobs
Subscribe to our ADMIN Newsletters
Support Our Work
Linux Magazine content is made possible with support from readers like you. Please consider contributing when you’ve found an article to be beneficial.

News
-
Substantial Update to IPFire Now Available
The lastest version of IPFire features a fundamental change to how the system handles DNS.
-
Gnome Working on Test Center App to Make Testing Easier
It's now possible to test experimental features on the Gnome desktop without worrying that you'll break things.
-
New Vulnerability Discovered in Linux Kernel
Hiding out for nearly 15 years, the Ghostlock vulnerability allows a standard logged-in user to gain root privileges.
-
New Linux Flaw Lets Attackers Escape VMs
A 16-year-old vulnerability allows an attacker to escape a virtual machine, gain access to the host, and execute malicious code.
-
Hannah Montana Linux Is Back!
Developer Noah Cagle decided the world needed the once obscure but beloved Linux distribution and gave it a decidedly pink refresh.
-
System76 Refreshes the Lemur Laptop
If you're looking for a laptop with tons of power and battery, look no further than the latest iteration of the System76 Lemur Pro.
-
More than 43 Million Lines of Code in Linux Kernel 7.2
Using the cloc utility, Michael Larabel of Phoronix discovered that Linux kernel 7.2 has over 43 million lines of code.
-
Kubuntu Focus Goes Ultra
The Kubuntu Focus team has upped the performance ante of its M2 and Zr laptops with the latest, greatest CPUs from Intel.
-
Linux Gamers May Soon See Less Mouse Lag in KDE Plasma
Gamers using KDE’s Plasma desktop have been suffering from a slight input delay in mouse movement that could lead to getting fragged.
-
Three Lines of Code Improve Linux Storage Performance
A developer changed three lines of code, giving Linux storage performance a 5% bump.