
Getting started with the Arduino IDE
User Friendly

© ktsdesign, 123rf.com
You don’t need to be a developer to work with this IDE.
Arduino single-board microcontrollers are common in the free software movement. With both hardware and software released under free licenses, the company’s products are widely used by hobbyists and, according to one estimate, around 7,646 companies. A key reason for this widespread use is the ease of use of the company’s software, particularly the Arduino IDE. Like most IDEs, Arduino’s automates many functions, such as compiling and flashing hardware, but what makes the Arduino IDE stand out is that it not only includes the features required by an experienced programmer, but arranges them in such a way that users can edit and develop source code with little or no development knowledge. I first learned to appreciate its utility while setting up my Keyboardio Model 01 keyboard seven years ago, and further uses have only reinforced my respect.
Installing and Setting Up the Arduino IDE
A version of the Arduino IDE is available in many distributions, including Debian and Ubuntu. However, the versions in distributions’ repositories are not always the most current, which may mean they are somewhat harder to use. The latest versions are available as AppImage or ZIP files on the Arduino Downloads page. Nightly builds are also available on the site, more as previews or as quick bug fixes. An installation wizard will guide you through the setup.
Once the IDE is installed, you need to make the IDE aware of any board with which it will be used. Today, that board will probably be connected to your system via a USB port, preferably not one on a hub. However, some boards, especially older ones, may require a serial port. The port to use is set on Tools | Port. If you have more than two boards, you can install additional ones via Tools | Board | Board Manager, which opens a sliding pane that shows all categories of supported boards (Figure 1). Note that if the system is attached to multiple boards, you will have to adjust the port and Board Manager fields each time you write or flash a different board. If you are uncertain of a board’s name, Tools | Get Board Info will provide the information you need (Figure 2).
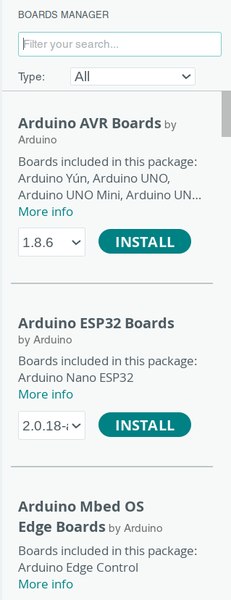 Figure 1: The Board Manager lists the categories of supported boards.
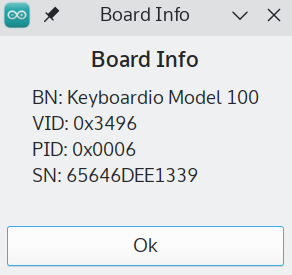 Figure 2: An automatically detected board.
Many boards also provide their own examples via a link under Files | Preferences | Additional boards manager URLS (Figure 3). These examples will be useful as you write firmware. Other details such as font size, themes, and file locations are also set from this window, although the defaults are generally adequate.
 Figure 3: Additional examples for a board are added by a link.
Writing Firmware
Firmware for Arduino boards is written in C and C++, with special rules for structuring. The source code for a piece of firmware is called a sketch and is modified in a text editor (Figure 4). Obviously, developers in these languages will have an advantage, but novices can do a surprising amount of on-the-fly learning and coding simply by modifying the samples provided under Files | Examples. Some board makers provide dozens of examples for specific boards and their supported macros that, with a little testing, can be combined or modified as desired. For example, for Keyboardio’s line of keyboards, a sketch can alter which character is printed when each key is pressed or change the color of a key’s LED light. More often than not, only the specifics need to be edited, while the rest of the code only needs to be copied.
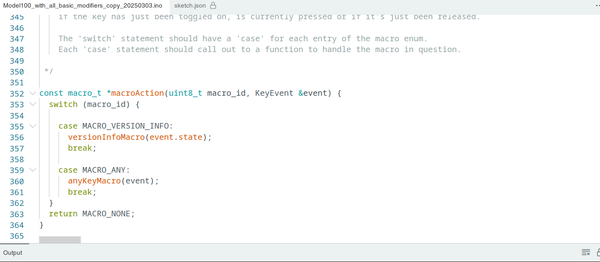 Figure 4: The text editor, showing code and comments.
Many examples, too, provide links to online help or provide heavily commented code. With a little tinkering, a novice can easily learn enough of the available options and structure to produce surprisingly sophisticated sketches. If they need additional help, they may find online forums where they can exchange tips and discuss problems.
In the Editing menu, you will find many tools to help you with your work, many similar to those in a word processor, such as copy, cut, and paste and various Find tools. In addition, because source code is commonly organized by indentations, there are tools for increasing and decreasing indents.
However, while developing a sketch, a few regular habits can make experimenting easier. For instance:
- Always keep a backup of a sketch you are working on, in case you need to revert to it.
- Never make too many modifications without compiling (see below). In fact, try to remember to compile after every modification. That way, if a compile fails, you know immediately which change needs to be corrected. If you make too many changes before you compile, you may waste time tracking down the problem.
- Add comments as reminders, especially if you work on the same sketch over more than a few hours. A comment is a line with two forward slashes (//) at the front and is basically a note about part of the sketch. It is ignored when compiling.
- Save sketches with the date and a brief description off their state so you can easily find them. When you finish coding, keep only the final success and backup. Sketches can be saved to a local directory or Sketchbook, or to the Arduino Cloud.
Compiling and Flashing Firmware
In the upper-left corner of the window are two buttons. The button on the left compiles the current sketch (Figure 5). In other words, it creates the binary firmware (but does not install it). The results of the attempt to compile are shown in the Output pane at the bottom of the window. The output will describe the error and often the line of the sketch on which the error appears. Compiling regularly can make tracking down errors easier.
 Figure 5: The output of a successful compile.
The second button from the left compiles the current sketch and attempts to flash, i.e., to install the binary on the board for which it is designed. Before flashing, you typically need to prepare the board for the download. For example, on the Keyboardio Model 100 keyboard, you must unplug the board, then plug it in with the prog button pressed down, which makes the key’s backlight red. When flashing begins, the LEDs in the two leftmost columns turn green, while the Output on the IDE displays the progress of the flashing in percentages. When the flashing succeeds, the keyboard’s behavior has been updated and tested (Figure 6).
 Figure 6: The output for a successful flashing of a board.
Buy Linux Magazine
Subscribe to our Linux Newsletters
Find Linux and Open Source Jobs
Subscribe to our ADMIN Newsletters
Support Our Work
Linux Magazine content is made possible with support from readers like you. Please consider contributing when you’ve found an article to be beneficial.

News
-
Yet Another Linux Kernel Vulnerability Discovered
Affecting millions of systems, a kernel flaw discovered by Qualys could allow users to gain root privileges.
-
Ubuntu 26.10 to Include Ubuntu Certified Hardware Check
If you've ever wondered if your laptop or PC is officially certified to run Ubuntu, that curiosity will soon be met.
-
Substantial Update to IPFire Now Available
The lastest version of IPFire features a fundamental change to how the system handles DNS.
-
Gnome Working on Test Center App to Make Testing Easier
It's now possible to test experimental features on the Gnome desktop without worrying that you'll break things.
-
New Vulnerability Discovered in Linux Kernel
Hiding out for nearly 15 years, the Ghostlock vulnerability allows a standard logged-in user to gain root privileges.
-
New Linux Flaw Lets Attackers Escape VMs
A 16-year-old vulnerability allows an attacker to escape a virtual machine, gain access to the host, and execute malicious code.
-
Hannah Montana Linux Is Back!
Developer Noah Cagle decided the world needed the once obscure but beloved Linux distribution and gave it a decidedly pink refresh.
-
System76 Refreshes the Lemur Laptop
If you're looking for a laptop with tons of power and battery, look no further than the latest iteration of the System76 Lemur Pro.
-
More than 43 Million Lines of Code in Linux Kernel 7.2
Using the cloc utility, Michael Larabel of Phoronix discovered that Linux kernel 7.2 has over 43 million lines of code.
-
Kubuntu Focus Goes Ultra
The Kubuntu Focus team has upped the performance ante of its M2 and Zr laptops with the latest, greatest CPUs from Intel.