
Stellarium
Explore the Night Sky with Stellarium
ByWhat shines in the dark is often hidden by clouds. Stellarium provides a clear view of the stars plus a lot of astronomical data.
A visit to a planetarium might be fascinating, but doesn’t occur very often. The Stellarium software, however, provides a really interesting and convenient alternative. Moreover, Stellarium helps in observing the actual night sky. Because the software presents the sky photorealistically, nothing stands in the way of making it available in a classroom or during a lecture. And, because Stellarium is available in the repositories for all the major distributions, installation is at the click of a button.
Photorealism
Photorealism means that Stellarium presents the sky as observers experience it on the ground. The software is aware of current events and exhibits the sky from the perspective of different parts of the globe. At night, the sky is dark and the stars are resplendent; during the day the sky is bright and the sun bursts on the landscape. One important element is missing in Stellarium: clouds, rain, and fog – precisely those meteorological phenomena that send many Central European amateur astronomers on distant travels, such as to Namibia or Tenerife, for a clearer view.
After starting up, Stellarium adopts a southern view of the sky at the current time of the preset location. The software takes the time from your computer’s clock, although you can set it to whatever you want. The same goes for the location, which is Paris by default. You can change the default to the location of your choice, for example, the Max Planck Institute for Astronomy, or your own garden. Help with settings is provided in the manual. You can even change the settings to provide interesting views from the moon, Mars, or Saturn.
Note that getting a fitting environment can be anything but trivial. In my test, an apartment building blocked part of my view of the sky.
Settings
Stellarium starts out in full screen mode to get a full view of the sky. The status bar at the bottom edge shows just the current observer location, field of view (FOV), frame rate, and current time and date.
Configuration is through keyboard shortcuts or menus that appear as soon as the cursor hits the left or bottom edge of the screen (Figure 1).
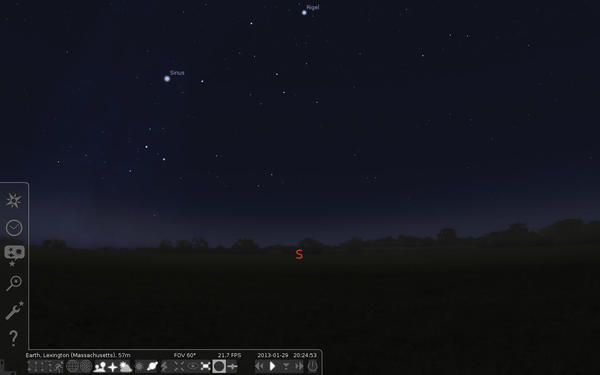 Figure 1: Menus and controls appear when the cursor hits the left or bottom edge of the screen.
All the settings you make are stored and persist through the next startup. The first setting, naturally, is the observer location. Press F6 or a menu item to open the matching dialog. Hovering over controls provides tooltips that explain the task and associated keyboard shortcut.
Time Machine
The time of observation is an important setting. You can’t get around it when you want to prepare for the moment of observation or represent historical astronomical events (Figure 2).
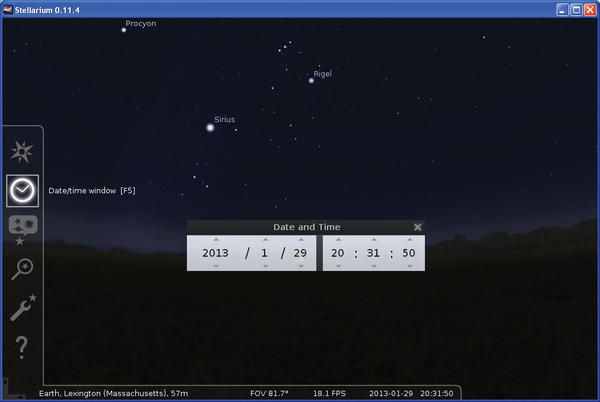 Figure 2: Date and time can be set for any astronomical event you want to capture.
Whether you want to see a Venus transit, eclipse, or conjunction, just enter the date and time, and Stellarium displays the event. You can set the time, for example, to the Venus transit of June 3, 1769, as seen from the North Pole. If desired, you can work from historical observations and compare them with contemporary reports.
Buttons below the date and time on the bottom tool bar allow for slowing or speeding up, moving in, or pausing time to study a particular moment of a phenomenon. You can pause by clicking the triangle icon; it changes to the double bar familiar to users of video recorders. The other speed controls are also familiar.
Preparation
Stellarium provides some useful help to prepare for an observation or photo session. The program shows great potential based on the growing number of its co-designers. Many observers are especially interested in what objects will appear on a given night. That leads naturally to the question about what equipment is the most suitable for observing the desired objects.
If you turn on Planet labels (P) and Nebulas (N) from the tool bar, you’ll see the planets with name labels, and nebulae and galaxies as yellow objects, with or without labels depending on size. The shape of the object tells you something about it. You can recognize globular clusters (a circle with a cross), open clusters (a circle), and close clusters (a dotted circle).
As soon as you start scrolling around an object (or press PgUp or PgDn), you’ll get a closer view of it (Figure 3).
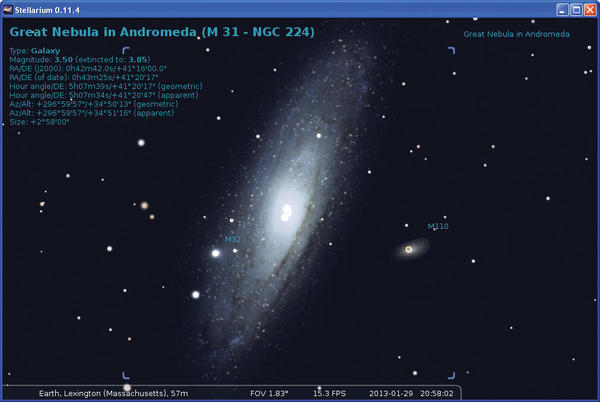 Figure 3: Zooming in on an object marked in yellow shows an impressive view. Shown is an enlargement of the Great Nebula in Andromeda (M31) with its neighboring galaxies.
The number of visible objects grows considerably if you take the extra effort of subsequently downloading catalogs on the Configuration window’s Tools tab.
Number Cruncher
Once you find out that an interesting object is traversing the sky, you might want to see what the object looks like in a particular telescope or sensor attached to a camera. Stellarium can help you here as well. You can get optical data from telescopes, oculars, and image sensors on the Oculars dialog. Click the Configuration window’s Plugins tab and choose Oculars on the left. Click the configure button at the bottom to open the Oculars dialog (Figure 4).
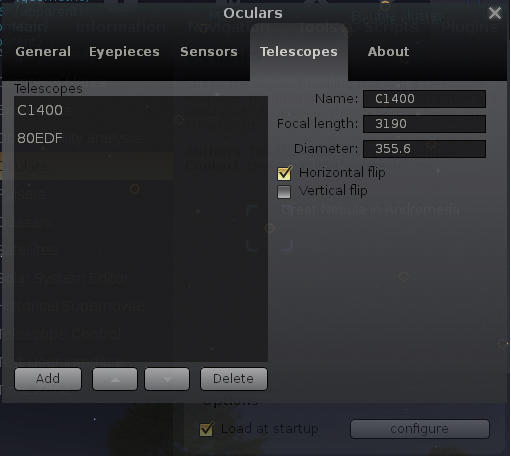 Figure 4: The Oculars dialog lets you zoom in on celestial objects as if with your own equipment.
Next, select a device from the various tabs: General, Eyepieces, Sensors, Telescopes, and About. Among this collection, you’ll find common settings, settings for existing oculars, sensors (cameras), and telescopes, as well as the usual recommendations from the author.
Enter the values on the tabs to fit your ocular equipment. The setting is preserved for each time that you choose Ocular view (Ctrl+O) for a selected object. With Alt+O, you can activate the ocular device, either an ocular or a telescope, then use Ctrl+O to toggle the ocular view.
Figure 5 shows how the software captures the Andromeda galaxy with an 80EDF telescope.
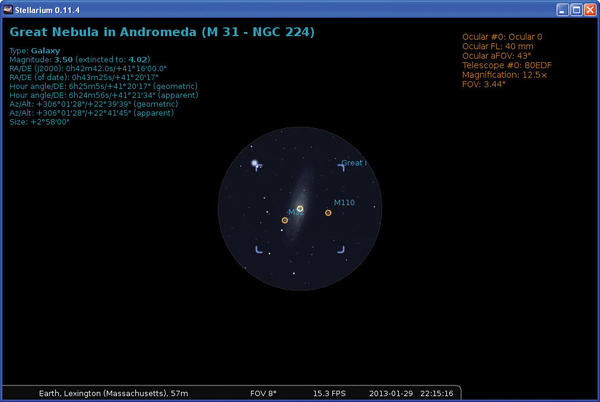 Figure 5: M31 shows up as if in an 80EDF telescope with an ocular width of 40mm. For more photorealism, you could remove the labels.
Clicking an object calls up its astronomical data in the upper left at the time and place of view. The important data apart from the catalog designation (e.g., M31 and NGC224) includes its light magnitude (3,50) and size (2°58’00”).
Both light magnitude and size are meaningful descriptors to experienced amateur astronomers in that they indicate how well the object can be observed under meteorological conditions. The smaller the magnitude, the brighter the object. The size is in reference to the angle at which the object appears to the naked eye. It should be mentioned that the ocular tool only works with a selected object. You can also find objects with the Search window tool (or press F3).
Mythology
Astronomy is among the oldest sciences with many myths surrounding it. If this interests you, Stellarium is a good starting out point for further research. Use F4 to configure the display accordingly. You can specify how to display stars on the Sky tab, determine whether to use stereographic projection on the Markings tab, and select a moonscape as the background on the Landscape tab. The Starlore tab provides insight into numerous cultural perspectives on astronomy (Figure 6).
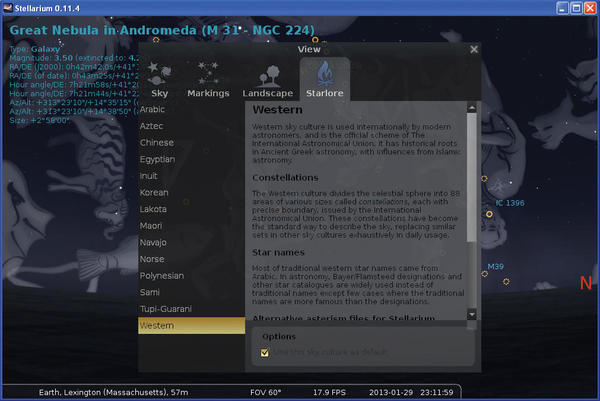 Figure 6: Stellarium shows the stars in the context of global cultures. For Western starlore, you can add constellation art to the celestial display.
Extras
If you’ve configured oculars, you might notice that Stellarium provides some extra plugins (Figure 7).
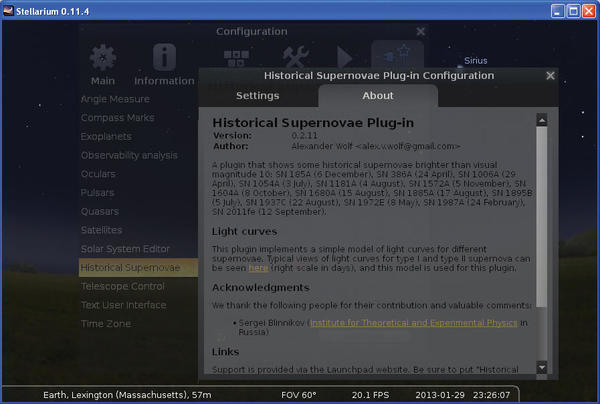 Figure 7: The plugins make the Stellarium experience particularly exciting. You can even simulate historical supernova events or control telescopes.
Among other items, you can download historical supernovae data. Be sure to click Load at startup when you configure the downloads. Then, go to the About tab and click the here link to open the “Historical Supernovae plugin” web page to obtain the SN numbers.
The SN number includes the year of the event and the web page lists the day and month. Stellarium also lets you control a “GoTo” telescope, although I wasn’t able to test it due to lack of the right hardware.
Conclusion
Stellarium proves to be an incredibly versatile tool for amateur astronomers and covers all their needs. Beyond its purely scientific core components, Stellarium also provides some interesting material for those interested in the world’s astronomical cultures.
The focus still remains on capturing a realistic view of the sky and its objects. It goes as far as the ability to select the environment and view a celestial object by telescope. Despite its complexity, all the necessary steps for configuration are child’s play.
The Author
Karl Sarnow has been a computer fan since his first TRS-80. As teacher of mathematics, physics and computer science, he developed networking concepts under Linux and related applications for schools and education. Since his retirement, he’s devoted his time to photography, travel, and astronomy. He’s also written an e-book on the use of open source software in astrophotography.
Subscribe to our Linux Newsletters
Find Linux and Open Source Jobs
Subscribe to our ADMIN Newsletters
Support Our Work
Linux Magazine content is made possible with support from readers like you. Please consider contributing when you’ve found an article to be beneficial.

News
-
EU Open Source Strategy Plays Key Role in Tech Sovereignty Package
Comprehensive measures adopted by the European Commission aim to reduce dependency on non-EU countries.
-
Linux Foundation Report Indicates AI Driving Tech Hiring
Within growing security and skills gaps, AI has been found to be a positive driving force behind tech hiring trends in Europe.
-
United Nations Open Source Portal Goes Live
A new open source portal seeks to coordinate and scale open source efforts across the United Nations system.
-
KDE Linux Drops AUR
KDE Linux developers have dropped the Arch User Repository from the build pipeline due to security concerns; other distributions should consider doing the same.
-
California May Exempt Linux from Its Age-Verification Law
After backlash from the Linux community, California may be backing off on its promise to force all operating systems to verify age, but one platform may still have to comply.
-
Another Logic Bug Found in Linux Kernel
Qualys has discovered a vulnerability in the Linux kernel that can be used to elevate standard user privileges.
-
Ubuntu Core 26 Offers Game-Changing Enterprise Features
Ubuntu Core 26 could be a game-changer for organizations looking for increased security and reliability.
-
AI Flooding the Linux Kernel Security Mailing List
AI is giving Linus Torvalds a headache, but not in the way you might think.
-
Top Priorities for Open Source Pros Seeking a New Job
Professional fulfillment tops the list, according to LPI report.
-
Container-Based Fedora Hummingbird Designed for Agent-First Builders
Fedora Hummingbird brings the same approach to the host OS as it does to containers to level up security.