Using Corel AfterShot Pro

RAW Muscle

© Lead Image © Rene Walter, 123RF.com

© Lead Image © Rene Walter, 123RF.com

Article from Issue 186/2016
Author(s):

Process and organize photos and RAW files with Corel AfterShot Pro.

When it comes to picking a tool for processing and organizing photos, Linux users are spoiled for choice: digiKam, Darktable, RawTherapee, UFRaw  – you have plenty of excellent RAW processing and photo management applications from which to choose. Thus, it might seem that opting for closed source commercial software like Corel AfterShot Pro doesn't make a lot of sense. And yet, this application offers plenty of powerful tools and advanced functionality that make it worth the asking price for some Linux photography enthusiasts.

Don't let the current version number of AfterShot Pro [1] fool you. This application is the continuation of the excellent Bibble Pro software, which was on version 5.2.3 when Corel took over its development and renamed it AfterShot Pro. In other words, AfterShot Pro is based on a mature and stable code base and features tried and tested graphical interfaces and tools (Figure 1). Maturity and stability are not AfterShot Pro's only attractions. The application is optimized for speed, and it runs blazingly fast, even on modest hardware.
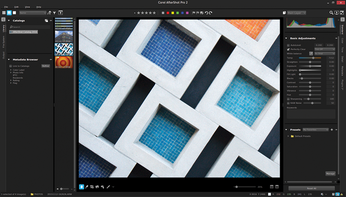
Figure 1: Corel AfterShot Pro is a capable application for processing RAW files and organizing photos.

Open source RAW decoders can give their proprietary counterparts a run for their money, but the RAW engine that powers AfterShot Pro can still yield better results with a minimum of manual tweaking. This can be particularly useful for photographers who want to get the most out of RAW files without too much work. AfterShot Pro will also appeal to users looking for advanced tools like adjustment layers, presets, versatile versioning functionality, tools for healing and cloning using regions, and high dynamic range (HDR) features. Add to this the ability to extend AfterShot Pro's default functionality via plugins, and you have a very compelling alternative indeed.

Although AfterShot Pro is a commercial product, it costs only a fraction of the price of its commercial competitors. The application is available in two editions: AfterShot Standard and AfterShot Pro. Among other things, Pro can handle more catalogs, layers, and custom correction tools. It also features the Perfectly Clear noise removal and powerful HDR functionality.

The AfterShot versus AfterShot Pro PDF document [2] provides a detailed description of the differences between the two editions. However, these differences are purely academic from a Linux user point of view, because only the Pro version of the application is available on Linux. Before you part with your money, though, you can download a 30-day trial version and see for yourself whether it fits your photographic needs. The trial version of AfterShot Pro (which can be unlocked later by purchasing a serial number) is available as DEB and RPM packages for both 32- and 64-bit architectures. Strangely, you can run the trial version in Standard mode, but you can't purchase a less expensive license key for it.

Organizing and Managing Photos

AfterShot Pro has two modes for working with photos and RAW files. In the filesystem mode, you can access, manage, and edit photos without importing them first. In this mode, the application creates an accompanying XMP file (also called sidecar) for each photo. All modifications and data applied to the photo are stored in this file. To access photos and RAW files on the local disk, switch to the File System section in the left panel and navigate to the desired directory using the Directory View.

The filesystem mode can be useful for accessing and editing the occasional photo or two, but to get the most out of AfterShot Pro's capabilities, you should import photos into a catalog in the Library. When in filesystem mode, select the desired photos in the thumbnail bar, and choose File | Import Selected Files.

Alternatively, you can import an entire folder containing photos with File | Import Photos from Folder. During import, AfterShot Pro allows you to apply custom import settings, such as keywords and presets to all imported photos. Importing photos and RAW files into a catalog doesn't actually move the images: this simply creates a database and accompanying files for storing relevant data in a dedicated directory.

Importing photos into a catalog has several advantages. This allows the application to maintain a full editing history with every modification made to the photo over time. It also allows you to search and browse photos by their metadata, including EXIF and IPTC. The catalog also lets you maintain image stacks, where the master file and its versions are grouped together.

Like any decent photo management application, AfterShot Pro supports standard tools for classifying and describing photos, including ratings, color labels, and flags. You can also assign keywords to each photo by switching to the Metadata section in the right panel and entering the desired keywords into the Keywords field.

AfterShot Pro also lets you create sets containing lists of often-used keywords (Figure 2). For example, you can create the Travel set containing keywords like cityscapes, nightscapes, and streets by selecting Manage in the Keyword Sets section. In the Keyword Manager window, add the desired keywords and their children in the left pane. Next, create a new keyword set in the right pane. Then, add the keywords to the set by dragging them from the left pane.

Figure 2: AfterShot Pro allows you to create keyword sets.

The application's filtering functionality can be used to display photos that match a specified rating, color label, and flag. Click on the Filter Tool icon in the upper left corner in the main window and define the filtering criteria; the application then will automatically display matching images (Figure 3). The Sorting drop-down list next to the filter tool lets you sort photos by various criteria, including rating, focal length, ISO, and F-Number. The Metadata Browser section in the Library section of the left panel allows you to browse photos in the catalog by their metadata. Here, you can view photos by camera model, aperture value, lens model, metering mode, and shutter speed.

Figure 3: Filter Tool lets you instantly filter images by specific criteria.

Editing Photos

AfterShot Pro supports non-destructive editing, meaning that none of the actions and modifications are applied directly to the original master file. The application saves all edits in the accompanying XMP sidecar file or in the catalog database. Additionally, AfterShot Pro makes it possible to create multiple versions of the original file. Creating a new version doesn't add a new image file: It simply stores a different set of edits for the master file. AfterShot Pro creates a new version of the master file as soon as you edit it. You can create additional versions at any time by selecting a thumbnail in the thumbnail bar and pressing the Insert key (or right-clicking on the thumbnail and choosing the appropriate command from the Version context menu).

All core adjustment tools in AfterShot Pro are tucked under the Basic Adjustments section that sits in the Standard tab in the right panel. Here, you'll find the usual assortment of tools for adjusting temperature, exposure, highlights, contrast, and saturation. In addition to this standard tool set, AfterShot Pro also features the proprietary Perfectly Clear tool. Billed as an intelligent image adjustment tool, Perfectly Clear makes it possible to improve photos with a single click. Although it's easy to dismiss this functionality as a gimmick, it is capable of producing decent results.

Preset support is de rigueur for any professional photo management application, and AfterShot Pro is no exception. The application comes with several ready-made presets in the Presets section under the Standard tab. Better still, AfterShot Pro lets you create custom presets based on the adjustments applied to the currently opened photo or RAW file (Figure 4). To create a new preset, press the Add Preset button in the Presets section, give the preset a descriptive name, select the adjustments you want to include, and hit OK.

Figure 4: AfterShot Pro supports custom presets.

To keep tabs on the presets, you can organize them into folders. To create a preset folder, press the Add Folder button at the bottom of the Presets section, give the folder a name, then drag and drop the desired preset items into the folder. All presets are saved as XMP files in the ~/.AfterShot/Presets/ directory, so you can easily back them up and share with other AfterShot Pro users.

AfterShot Pro also allows you to copy and paste adjustments between images, which can be useful when you need to apply edits made to an image to another photo without creating a dedicated preset. To do this, select the source image in the thumbnail bar and choose Edit | Copy Image Settings (or Copy Selective Image Settings if you want to apply individual adjustments). Then, select the target image and choose Edit | Paste Image Settings.

The Color tab in the right panel contains color correction tools, including Curves, Color Balance, and Color Correction (Figure 5). The latter makes it possible to apply selective color adjustments to the image based on a selected color. You can select one of the default primary or secondary colors in the color wells (color squares at the top of the Color Correction section) or pick any color from the image using one of the empty color wells. To do this, click on the empty color well. Click on the empty color square next to the Hue adjustment slider to choose a color from a color palette. Alternatively, enable the color picker by clicking on the Selective Color Data Settings icon next to the Hue slider, and click on the region of the image containing the desired color. You can then apply hue, saturation, luminance, and range adjustments to the selected color only.

Figure 5: The application has all essential color adjustment tools, including Color Correction.

Adjustment layers is where AfterShot Pro comes into its own, and the application makes use of layers for selective editing as well as healing and cloning adjustments (Figure 6). Selective editing can be useful when you need to make adjustments just to a specific area in the image. Suppose, for example, you need to lighten an underexposed area in a photo. Click the Layer Manager icon in the upper right corner of the top toolbar and press Adjust to add an adjustment layer. Use then a selection tool (you can choose between Circle, Polygon, Curve, and Brush) to define a selection area on the image. Once you've done that, all adjustments you make are applied to the selected area only.

Figure 6: AfterShot Pro uses adjustment layers for selective editing as well as healing and cloning actions.

The Heal and Clone adjustment layer works in a similar manner, but it's designed for removing minor spots and blemishes. To remove a spot, click the Heal/Clone button in the Layer Manager palette to create a new layer, choose the Circle selection tool, and click on the spot you want to fix. Choose the Heal or Clone option from the Mode drop-down list, and adjust the Feather and Size settings, if necessary.

AfterShot Pro's default functionality can be extended using plugins, and you can find a handful of free modules in the official plugin repository [3]. For example, AfterShot Pro lacks a perspective correction functionality; the zPerspector plugin fills the void (Figure 7). To install this or any other plugin, download its .afzplug package, choose File | Install Plugin in AfterShot Pro, and select the downloaded file. Once installed, the plugin's interface can be accessed under the Plugins tab in the right panel.

Figure 7: zPerspector plugin in action.

Because AfterShot Pro stores all adjustments in XMP files or a database, you need to run an export action to generate a processed photo. There are two ways to do that: Select the images you want to export in the thumbnail bar and choose File | Export | Export Files (or use Ctrl+S). In the Export Files dialog, specify the required settings (destination directory, image format, quality, size, etc.) and hit OK.

Specifying settings manually every time you export photos can quickly become a nuisance, so AfterShot Pro supports so-called batch presets, or ready-made export profiles. AfterShot Pro comes with several batch presets for common formats, such as 16-bit TIFF, 8-bit TIFF, and full-size JPEG. To export photos using a batch preset, choose File | Export with Batch Preset and select the desired preset item. Alternatively, you can use the keyboard shortcut assigned to the preset. The application lets you create custom batch presets, too (Figure 8). To create a batch preset, choose File | Export with Batch Preset | New Batch Preset, give the preset a name, and configure the available options.

Figure 8: AfterShot Pro makes it possible to create custom batch output presets.

Final Word

In this article, I covered only some of the key features of AfterShot Pro, but it should give you a general idea of AfterShot Pro's capabilities and help you to decide whether the application fits your photographic needs. Of course, adding AfterShot Pro to your photographic toolbox doesn't mean you have to give up other open source applications you already use. For example, you can still use digiKam's superior tools to import, rename, and organize photos, and then process individual RAW files in AfterShot Pro, when needed.

Buy this article as PDF

Express-Checkout as PDF
Price $2.95
(incl. VAT)

Buy Linux Magazine

SINGLE ISSUES
 
SUBSCRIPTIONS
 
TABLET & SMARTPHONE APPS
Get it on Google Play

US / Canada

Get it on Google Play

UK / Australia

Related content

comments powered by Disqus
Subscribe to our Linux Newsletters
Find Linux and Open Source Jobs
Subscribe to our ADMIN Newsletters

Support Our Work

Linux Magazine content is made possible with support from readers like you. Please consider contributing when you’ve found an article to be beneficial.

Learn More

News