Publish Photos with PhotoShow

Productivity Sauce
Hosting your own photo sharing solution makes a lot of sense, but setting up and maintaining a full-blown application like Gallery or Piwigo requires some technical chops and can be a time-consuming affair. Enter PhotoShow, an open-source photo sharing software that can be deployed in a matter of minutes and requires practically no maintenance.
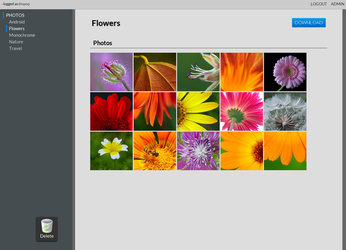
Unlike many other photo sharing applications, PhotoShow doesn't use a database back end, which dramatically simplifies the installation procedure. In fact, there is no installation procedure to speak of. Grab the latest release of PhotoShow from the project's website GitHub repository, unpack the downloaded archive, and rename the resulting directory (e.g., photoshow). Open the /photoshow/config.php file in a text editor and specify two parameters: $config->photos_dir (the directory containing your photos) and $config->ps_generated (directory for storing contents generated by the application). Move the entire photoshow directory to your server, and point your browser to http://127.0.0.1/photoshow. When prompted, specify a user name and password for the administrative account, and you're done. To configure the application's settings, log in using the specified credentials, and switch to the Admin section. Here, you can specify a gallery title, disable registration and the ability to download photos and entire albums as well as enable Facebook and Google+ buttons. PhotoShow supports comments, but the application doesn't provide any anti-spam functionality. So you might want to disable the commenting feature altogether. In the Admin section, you can also add users and groups and organize them into groups. Later, you can make any photo private and grant access to it to specific users and groups.
Populating PhotoShow with photos is as easy as dropping them onto the upload area in the right sidebar. While PhotoShow doesn't support tags, it allows you to organize your photos into albums and sub-albums. You can create as many albums as you need using the appropriate button in the right sidebar. Another way to add photos to your PhotoShow instance is to simply copy them directly to the directory path which is specified in the /photoshow/config.php file. This means that you can upload photos (and create folders, i.e., albums) from any machine and device as long as the target directory is accessible via FTP, SSH or other protocols. For example, using apps like FolderSync, you can upload photos from an Android device directly to your PhotoShow installation, provided you can connect to the server via FTP.
A quick tip: before you add photos to PhotoShow, it's a good idea to resize them to speed up the gallery. You can use the convert tool, which is part of the ImageMagick package, to do this. The following command processes all JPG images in the current directory, reducing their size by 50% and setting their quality to 91%:
for i in *.jpg; do echo "$i"; convert "$i" -resize 50% -quality 91% "$i"; done
While PhotoShow lacks all the bells and whistles of more advanced photo sharing applications, this tool is perfect for hosting a no-frills photo gallery on your own server with a minimum of effort.
comments powered by DisqusSubscribe to our Linux Newsletters
Find Linux and Open Source Jobs
Subscribe to our ADMIN Newsletters
Support Our Work
Linux Magazine content is made possible with support from readers like you. Please consider contributing when you’ve found an article to be beneficial.

News
-
Parrot OS Switches to KDE Plasma Desktop
Yet another distro is making the move to the KDE Plasma desktop.
-
TUXEDO Announces Gemini 17
TUXEDO Computers has released the fourth generation of its Gemini laptop with plenty of updates.
-
Two New Distros Adopt Enlightenment
MX Moksha and AV Linux 25 join ranks with Bodhi Linux and embrace the Enlightenment desktop.
-
Solus Linux 4.8 Removes Python 2
Solus Linux 4.8 has been released with the latest Linux kernel, updated desktops, and a key removal.
-
Zorin OS 18 Hits over a Million Downloads
If you doubt Linux isn't gaining popularity, you only have to look at Zorin OS's download numbers.
-
TUXEDO Computers Scraps Snapdragon X1E-Based Laptop
Due to issues with a Snapdragon CPU, TUXEDO Computers has cancelled its plans to release a laptop based on this elite hardware.
-
Debian Unleashes Debian Libre Live
Debian Libre Live keeps your machine free of proprietary software.
-
Valve Announces Pending Release of Steam Machine
Shout it to the heavens: Steam Machine, powered by Linux, is set to arrive in 2026.
-
Happy Birthday, ADMIN Magazine!
ADMIN is celebrating its 15th anniversary with issue #90.
-
Another Linux Malware Discovered
Russian hackers use Hyper-V to hide malware within Linux virtual machines.

