Photo editing with Darktable 1.6

Not Totally Green

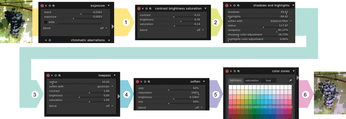
Parts of the white wall also radiate in a bright green hue after lightening the image, thus distracting from the grapes. The complex functions in color zones (color group category), which selectively modify the lightness, saturation, and hue, can help with this. You can use them to darken, desaturate, and color the yellow-green shades in the picture to a warmer (i.e., redder) hue.

The saturation curve in the tab of the same name (Figure 6) makes the most important contribution by turning the overly lavish green into a subtle neutral gray. If you mouse over the color chart, a circle and white background shows the strength of an adjustment on adjacent nodes. You can use the mouse wheel to modify the size of the circle. Clicking a node and dragging it vertically adjusts saturation accordingly. Smooth, granular operations are thus easy to achieve.

Figure 6: You can get rid of the annoying green color cast under the leaf canopy using the color zones tool.

You can also reduce the lightness of the greens in the same color range. The curve superimposed from the saturation tab shows the section of the spectrum that was already used in desaturation.

The effect of the third tab hue is a little more difficult to understand: Moving the control points causes a color transformation from the color square where the shift starts to the color square where it ends (Figure 6, right inset). In other words, if you drag a control point from deep green toward orange, as shown in the picture, you are modifying the green tones in the image accordingly.

As so often happens in image editing, the best results can occur when trying things out – and, as always in Darktable, a double-click will reset the curve.

Contrasts

The image now appears to have a more balanced exposure; however, it also seems flat and has little contrast. To spice up overly gray photos, the zone system tool (Figure 7) under the tone group toggle is a big help. It divides the brightness spectrum into nine zones which the gray wedge symbolizes. If you mouse over a zone, any areas in the image with that brightness level light up in yellow in the thumbnail in the panel.

Figure 7: The sun is shining: The zone system influences light and shadows in the image in a granular way, which is far more appropriate for sunny surroundings in this example image.

If you move the mouse to the bottom edge of one of the zone boundaries, a slider appears. You can use the slider to move the edge of the gray field and increase (by dragging to the right) or reduce (by dragging to the left) the brightness of the corresponding image areas. In this way, you can redistribute light and shadows.

Expanding the dark areas and highlights increases the contrast and adds a touch of sunshine to many a gloomy, rainy image. In the example image, it restores light conditions to match what is actually a sunny scene. Figure 7 shows the results and how to move the brightness zones.

Color Play

The lead image for this article [4] does not require any rework in terms of exposure. Because there are no technical shortcomings to compensate for here, I will just play around with it instead. Figure 8 shows a brightly colored variant, which was created by applying color filters to parts of the photo.

Figure 8: The Darktable color tools are good for smooth, realistic operations. They were used for colorful effects in this playful demonstration.

In Darktable, two image segment selection techniques work hand-in-hand: the shape selection, with which you can roughly cut out areas using a brush, and the parametric selection, with which the program again isolates specific color or brightness areas within this initial selection. All you need to do, as shown in Figure 9, is paint over a tomato with a generous border using the mask brush. The decisive thing is that the selection does not include any other red objects; thankfully, this action does not require fine motor skills.

Figure 9: The brush selection (i.e., everything inside the dotted line) slightly exceeds the desired image section. That doesn't matter here because of the subsequent selection based on the color.

To begin, switch on the color contrast filter from the color group toggle in the palette header. You will be using this to paint the front tomato purple. First, create a mask so that the filter does not affect the whole image: The somewhat misleadingly named blend list box is responsible for this.

Next, select drawn & parametric mask for a rough selection made with the brush, which further narrows down the color selection. Then, create the brush preselection. To do this, click the pencil icon below drawn mask. The cursor turns into a gray brush; you can control the size of this using the mouse wheel. Generously paint over the whole tomato while holding down the mouse button.

Buy this article as PDF

Express-Checkout as PDF
Price $2.95
(incl. VAT)

Buy Linux Magazine

SINGLE ISSUES
 
SUBSCRIPTIONS
 
TABLET & SMARTPHONE APPS
Get it on Google Play

US / Canada

Get it on Google Play

UK / Australia

Related content

  • Darktable 1.2

    Darktable shines as the most powerful free RAW converter, with impressive new features in the current version 1.2.

  • ART – Another RawTherapee

    RAW converters are the first tool to use in editing photos, and new solutions and programs have the potential to make users' lives easier. How does ART stack up?

  • Perfect Balance

    The current RawTherapee version finally adds selective image editing, among other long-desired features, to help it compete with king of the hill, darktable.

  • Tutorial – Krita

    Not many people are aware that Krita, the popular open source painting program, is also great for editing photos.

  • Dance on a Volcano

    The RAW converter Vulkan darktable outpaces its competitors with a modern node-graph-based architecture and massive use of the GPU.

comments powered by Disqus
Subscribe to our Linux Newsletters
Find Linux and Open Source Jobs
Subscribe to our ADMIN Newsletters

Support Our Work

Linux Magazine content is made possible with support from readers like you. Please consider contributing when you’ve found an article to be beneficial.

Learn More

News