


Keep Files in Sync
Connecting Devices
Every Syncthing installation has a unique device ID, which is a long alphanumeric string that identifies your device to others. You can think of it like a fingerprint. To see your device ID, click Actions | Show ID. You'll see both the full ID and a QR code. The device ID is crucial because Syncthing uses a trust model. Two devices won't sync unless they both know and trust each other's IDs. This prevents random devices from connecting to yours.
Now install Syncthing on your second machine following the same steps above. Then, on one machine, click the Add Remote Device button. You'll need to paste in the device ID from the other machine. Give it a friendly name like Desktop or Laptop so you remember which is which. You can also select which folders you want to share with this device here, though I'll get to that in a moment.
Once you've added a device, the other machine will get a notification asking if it wants to accept the connection. Approve it, and your devices are paired.
Sync Folders
Just because two devices are connected doesn't mean they automatically sync everything. You choose which folders go where. By default, Syncthing creates a folder named Sync in your home directory. This is a good place to start experimenting, but you'll probably want to sync other folders too.
Click Add Folder and give your folder a label (e.g., Photos or Projects). Then set the folder path, which can be anywhere on your system. Maybe you want to sync your entire Documents folder or perhaps just a specific project directory.
Now comes the key part: Click on a folder to expand it. Here, head to Edit and switch to the Sharing tab. You'll now see a list of connected devices. Select all the devices that should have access to this folder (Figure 5).
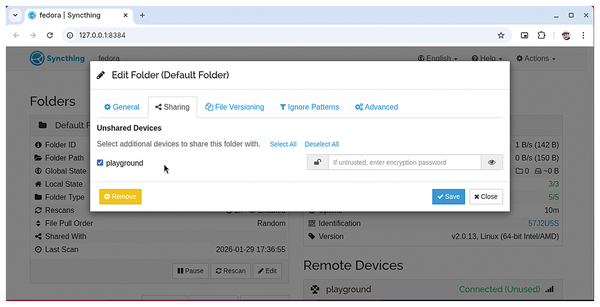 Figure 5: For added security, you can set a password on a folder when sharing it with another device.
You'll learn to appreciate this granular control when syncing multiple folders to multiple machines. For instance, you can make your home PC sync everything with a secondary machine, while your office laptop gets just your work documents, and your media center only gets photos and videos.
When you click on a folder in the Syncthing web interface, the entry expands to display detailed information about its synchronization status, configuration, and health. You'll see each folder's state, such as Up to Date, Syncing, Scanning, or Paused. The information also shows the total size and number of files in the latest version of the folder across the entire cluster, as well as the total size and number of files currently present on your local machine. You can also see bandwidth usage from the web interface and even set limits if you're on a metered connection using Actions | Settings | Connections to cap upload and download speeds.
Just like FreeFileSync, Syncthing also has the ability to keep old versions of files before overwriting or deleting them. This setting is done at the folder level. Expand any folder, click on the Edit button, and switch to the File Versioning tab. The pull-down menu lists several options:
- Trash Can File Versioning moves the affected file to the trash can inside the
.stversionsfolder. If a file of the same name exists in the trash can, it is replaced. - Simple File Versioning offers a better approach by keeping a specified number of timestamped old versions.
- Staggered File Versioning keeps versions based on age by preserving recent versions in detail, while older ones are thinned out to save space (hourly revisions are kept for a day, daily revisions for a month, weekly revisions for a year, and so on).
- External File Versioning lets you run a custom script for handling versions.
I usually select Staggered File Versioning, setting it to keep versions for 30 days. It strikes a good balance between safety and disk usage.
Running Syncthing as a Service
By default, Syncthing only runs when you manually start it. For continuous synchronization, you will want it running all the time in the background. To run it as a service, copy its systemd service file from under the extracted syncthing directory (under /etc/linux-systemd/user) to ~/.config/systemd/user/.
With the file in place, enable and start the service with
$ systemctl --user enable syncthing.service
$ systemctl --user start syncthing.service
I've copied the service file to the directory where individual users store their custom systemd unit files to manage processes under their control, without needing root privileges. Furthermore, the --user flag ensures Syncthing runs under your user account rather than as a system service.
« Previous 1 2 3 Next »
Buy this article as PDF
(incl. VAT)
Buy Linux Magazine
Subscribe to our Linux Newsletters
Find Linux and Open Source Jobs
Subscribe to our ADMIN Newsletters
Digital Autonomy
• How the Fediverse Found Parts for Its Platforms
• The Answer Was Already on the Shelf
• Changing the Chip Industry: How Public Investment Has Grown Open Silicon
• United Nations Open Source Portal Goes Live
• EU Open Source Strategy Plays Key Role in Tech Sovereignty Package
• France Says “Au Revoir” to Microsoft
Support Our Work
Linux Magazine content is made possible with support from readers like you. Please consider contributing when you’ve found an article to be beneficial.

News
-
Linux Mint 27 Set for a Christmas Release
The developers behind Linux Mint have announced a Christmas release, and it looks like Santa's sack will be brimming with features.
-
Is Linus Torvalds Vibe Coding?
The creator of Linux has added AI into his process for Linux kernel development, and it's more than just for debugging.
-
openKylin 3.0 Released with Expanded AI Integration
The latest release features a pre-installed AI agent to help perform tasks.
-
DigitalOcean Ends Open Source Credits Program
In a change that has surprised many open source developers, DigitalOcean has decided to sunset its Open Source Credits Program.
-
Office 365 Available for Testing on Linux via Bottles
Linux users can now test the official Office 365, thanks to Mirko Brombin's work on Bottles.
-
Dutch Government Turns to Open Source for Digital Sovereignty
Following in the footsteps of other European countries, the Netherlands is looking to increase its sovereign digital infrastructure with open source software.
-
Linux May Soon Work on Snapdragon X2-Based PCs
If you're thinking about buying a Snapdragon X2-based desktop or laptop, Linux may soon be an option.
-
KDE for People Initiative Calls for AI Ban in Plasma
A new community of KDE wants the project to adopt a strict no-AI policy for KDE Plasma.
-
KDE Sets Ambitious Goals for 2026 and Beyond
KDE Connect reveals the goals for the Linux desktop darling, with one of those goals long overdue.
-
It’s Time to Test Fedora 45 Beta
Fedora 45 beta has been released with updated Gnome, KDE Plasma, and kernel.