
Use an Android smartphone as a Raspberry Pi screen
Call Me
If you use the Raspbian Pixel desktop, an X server is already running and all programs send the graphic output to this local server. However, this can be easily changed for individual programs, because each program checks the DISPLAY environment variable. You can change this value by specifying the value at the command line for one program only (line 1) or for all subsequent commands (line 2):
$ DISPLAY=192.168.2.34:0 xeyes
$ export DISPLAY=192.168.2.34:0
The syntax of the DISPLAY variable always follows the pattern <IP address>:<X>.<Y>. On most systems the suffix (i.e., the display/screen number) is 0.0, or simply 0. You can also use the hostname of the target device instead of the IP address.
If you always use the same device in combination with the Rasp Pi, you should enter the display variable in the /etc/profile file, which sets the variable globally. However, this setting only applies to new sessions, and you do not want to do this for Pixel systems, because the output of the desktop on the locally connected screen requires the default value DISPLAY=:0.0.
Superficial
Creating a graphical user interface for a program is one of the most complex tasks in IT. Everyone can and wants to have a say, and everyone has a different idea of what a beautiful interface or ergonomic design is. This topic is non-trivial, because you need to keep the program operable even if it is busy doing other things (e.g., computing).
Fortunately, many libraries exist that make your life simple. The example here uses the Python programming language. Originally, the modern Kivy [5] was intended as a graphics library, but it uses highly efficient OpenGL for direct rendering, which does not work over the network. The project is now based on wxPython, a wrapper for the wxWidgets toolkit implemented in C++.
For your Raspberry Pi, you need to create a program that simulates a multiline liquid crystal display with control buttons (Figure 3). At the push of a button, you can request various items of system information, and the results end up in a text box. The whole thing can be implemented with surprisingly few lines of code.
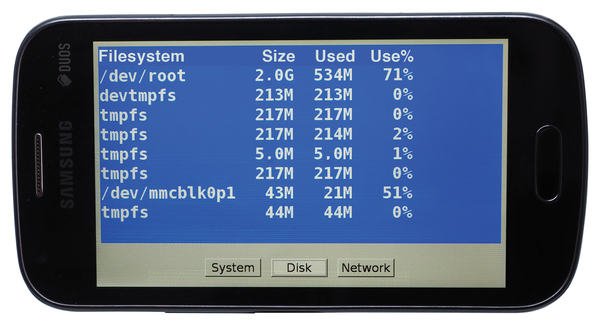 Figure 3: The sample program on a smartphone with a screen resolution of 800x480 pixels.
Before programming, you have to install the required Python library:
$ sudo apt-get update
$ sudo apt-get -y install python-wxgtk3.0
On Raspbian Lite, the command also installs all the necessary auxiliary libraries for running graphical applications (i.e., the X client), so don't worry if the package list looks very long.
If required, also set up the wx3.0-examples package with examples in C++. Because method calls in C++ and Python are almost identical, the examples can be transferred easily to the Python world.
wxPython
The basic architecture of a wxPython program is no different from any other program with a graphical user interface. The main part consists of an infinite loop, known as the event loop.
Every interaction with the program, such as pressing a button, entering text, or moving the window, triggers an event. The event loop processes the interaction by passing it to the appropriate Python methods. The sample program has three buttons and, thus, three methods for processing.
In Listing 1, you can see the most important sections of the WxVlcdApp.py program, which you can find in my GitHub repository [6]. The event loop described can be found in the last line, which is where the program calls the MainLoop() method of the WxVlcdApp application class defined earlier.
Listing 1
WxVlcdApp.py (Excerpt)
The class extends the wx.App class and consists here of only a single method, OnInit(), which generates the application's user interface. To do this, a separate class, AppFrame, is defined (line 22) that constitutes the main part of the program.
The AppFrame constructor first creates the graphical elements in the create_controls() method (line 35), for which you use a BoxSizer() – known from other toolkits as BoxLayout(), or something similar.
This layout element aligns its children vertically; in the example these are the output text boxes and the buttonbar. The parameters of the Add() method define which child is allowed to expand and how it aligns itself. Further details can be found in the documentation for wxPython. Similarly, the create_buttons() method (starting in line 45) creates the toolbar. Here, three buttons are arranged in a horizontal BoxSizer().
Additionally, lines 50 through 52 determine which methods the program executes when the individual buttons are pressed. To add more buttons, simply copy and paste the lines in question.
« Previous 1 2 3 Next »
Buy this article as PDF
(incl. VAT)
Buy Linux Magazine
US / Canada
UK / Australia
Subscribe to our Linux Newsletters
Find Linux and Open Source Jobs
Subscribe to our ADMIN Newsletters
Support Our Work
Linux Magazine content is made possible with support from readers like you. Please consider contributing when you’ve found an article to be beneficial.

News
-
Canonical Releases Ubuntu 24.04
After a brief pause because of the XZ vulnerability, Ubuntu 24.04 is now available for install.
-
Linux Servers Targeted by Akira Ransomware
A group of bad actors who have already extorted $42 million have their sights set on the Linux platform.
-
TUXEDO Computers Unveils Linux Laptop Featuring AMD Ryzen CPU
This latest release is the first laptop to include the new CPU from Ryzen and Linux preinstalled.
-
XZ Gets the All-Clear
The back door xz vulnerability has been officially reverted for Fedora 40 and versions 38 and 39 were never affected.
-
Canonical Collaborates with Qualcomm on New Venture
This new joint effort is geared toward bringing Ubuntu and Ubuntu Core to Qualcomm-powered devices.
-
Kodi 21.0 Open-Source Entertainment Hub Released
After a year of development, the award-winning Kodi cross-platform, media center software is now available with many new additions and improvements.
-
Linux Usage Increases in Two Key Areas
If market share is your thing, you'll be happy to know that Linux is on the rise in two areas that, if they keep climbing, could have serious meaning for Linux's future.
-
Vulnerability Discovered in xz Libraries
An urgent alert for Fedora 40 has been posted and users should pay attention.
-
Canonical Bumps LTS Support to 12 years
If you're worried that your Ubuntu LTS release won't be supported long enough to last, Canonical has a surprise for you in the form of 12 years of security coverage.
-
Fedora 40 Beta Released Soon
With the official release of Fedora 40 coming in April, it's almost time to download the beta and see what's new.