
Backdoors in Machine Learning Models
Interest in machine learning has grown incredibly quickly over the past 20 years due to major advances in speech recognition and automatic text translation. Recent developments (such as generating text and images, as well as solving mathematical problems) have shown the potential of learning systems. Because of these advances, machine learning is also increasingly used in safety-critical applications. In autonomous driving, for example, or in access systems that evaluate biometric characteristics. Machine learning is never error-free, however, and wrong decisions can sometimes lead to life-threatening situations. The limitations of machine learning are very well known and are usually taken into account when developing and integrating machine learning models. For a long time, however, less attention has been paid to what happens when someone tries to manipulate the model intentionally.
Adversarial Examples
Experts have raised the alarm about the possibility of adversarial examples [1] – specifically manipulated images that can fool even state-of-the-art image recognition systems (Figure 1). In the most dangerous case, people cannot even perceive a difference between the adversarial example and the original image from which it was computed. The model correctly identifies the original, but it fails to correctly classify the adversial example. Even the category in which you want the adversial example to be erroneously classified can be predetermined. Developments [2] in adversarial examples have shown that you can also manipulate the texture of objects in our reality such that a model misclassifies the manipulated objects – even when viewed from different directions and distances.
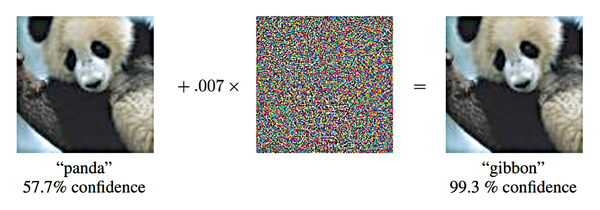 Figure 1: The panda on the left is recognized as such with a certainty of 57.7 percent. Adding a certain amount of noise (center) creates the adversarial example. Now the animal is classified as a gibbon [3]. © arXiv preprint arXiv:1412.6572 (2014)
[...]
Buy this article as PDF
(incl. VAT)
Buy Linux Magazine
Subscribe to our Linux Newsletters
Find Linux and Open Source Jobs
Subscribe to our ADMIN Newsletters
Support Our Work
Linux Magazine content is made possible with support from readers like you. Please consider contributing when you’ve found an article to be beneficial.

News
-
Nitrux 6.0 Now Ready to Rock Your World
The latest iteration of the Debian-based distribution includes all kinds of newness.
-
Linux Foundation Reports that Open Source Delivers Better ROI
In a report that may surprise no one in the Linux community, the Linux Foundation found that businesses are finding a 5X return on investment with open source software.
-
Keep Android Open
Google has announced that, soon, anyone looking to develop Android apps will have to first register centrally with Google.
-
Kernel 7.0 Now in Testing
Linus Torvalds has announced the first Release Candidate (RC) for the 7.x kernel is available for those who want to test it.
-
Introducing matrixOS, an Immutable Gentoo-Based Linux Distro
It was only a matter of time before a developer decided one of the most challenging Linux distributions needed to be immutable.
-
Chaos Comes to KDE in KaOS
KaOS devs are making a major change to the distribution, and it all comes down to one system.
-
New Linux Botnet Discovered
The SSHStalker botnet uses IRC C2 to control systems via legacy Linux kernel exploits.
-
The Next Linux Kernel Turns 7.0
Linus Torvalds has announced that after Linux kernel 6.19, we'll finally reach the 7.0 iteration stage.
-
Linux From Scratch Drops SysVinit Support
LFS will no longer support SysVinit.
-
LibreOffice 26.2 Now Available
With new features, improvements, and bug fixes, LibreOffice 26.2 delivers a modern, polished office suite without compromise.