
Sending push notifications with ntfy
Creating an Admin User
Given that ntfy is configured to deny all access by default, you still can't do anything in ntfy's web interface. First, you must create users and give them publish or subscribe permissions for specific topics. To do so, open a shell within ntfy's Docker container:
$ docker exec -ti ntfy /bin/sh
You can then list the users:
/ # ntfy user list
user * (role: anonymous, tier: none)
- no topic-specific permissions
- no access to any (other) topics (server config)
This shows you that anonymous (unauthenticated) users have no permissions at all, which is what you configured with auth-default-access: "deny-all" in Listing 1. Now, add an admin user, in this example called admin:
/ # ntfy user add --role=admin admin
user admin added with role admin
You'll be prompted to set and confirm the user's password. Users with the role admin can publish and subscribe to all topics.
Testing Notifications
To test notifications in the web interface, first add the line enable-login: true to the server.yml file and restart ntfy with
docker-compose restart ntfy
Then reload the web page and click on Sign in at the top right. Log in with the username admin (or whichever you chose) and the password you've set.
First click on Subscribe to topic. Just choose a name (or click on Generate name to let ntfy choose a random name) and click on Subscribe. Then click on Publish notification and enter a random topic name. Provide a title and a message for your notification and click on Send (Figure 2).
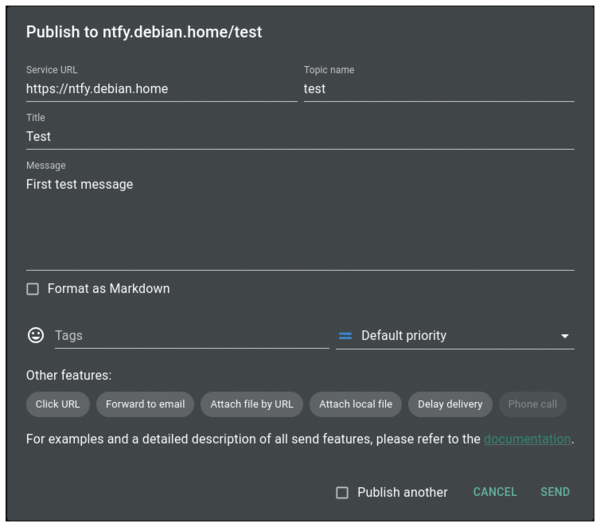 Figure 2: Publish a notification from your web browser.
Your test message appears in a "conversation" with the topic's name. If you enabled notifications in your web browser earlier, you'll receive a notification from your web browser upon receiving this message. You can mark a message as read by clicking on the check mark next to it.
Receiving Notifications via Smartphone
Because you might not have the ntfy web application open at all times, you might want to receive notifications on your smartphone. For this, ntfy provides a mobile app for Android and iOS, which allows you to subscribe to notifications (although publishing isn't possible). The Android version can be installed either via Google Play or F-Droid [3]. The F-Droid version doesn't use Firebase, which is fine for a self-hosted setup.
To create a user with read-only permissions, enter the following commands in the container's shell:
/ # ntfy user add android
user android added with role user
/ # ntfy access android "*" read-only
granted read-only access to topic *
user android (role: user, tier: none)
- read-only access to topic *
After entering the first command, you'll be prompted to set a password for the user. Next, open the Android app, tap on the three dots in the top-right corner, choose Settings, and then let Default server point to your ntfy server's domain. After a tap on Manage users and Add new user, enter your ntfy server's URL, the username android, and the user's password. Then, tap on Add user.
Now return to the app's main screen and tap on the + icon in the bottom-right corner. Enter the topic name and tap on Subscribe. The app now shows a notification for every received message on this topic, and it even shows the already sent messages (Figure 3).
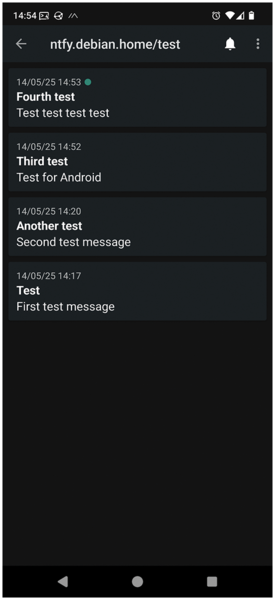 Figure 3: The Android app receives a notification for any message on the subscribed topic.
Note that the app presents two warnings on its home screen. First, it advises disabling battery optimization to avoid notification delivery issues. You should also permit background usage for the app. Of course, this decreases battery life. The other warning is a suggestion to switch to WebSockets instead of an HTTP stream. Simply tap on Enable now in the app. To make this work, WebSockets should also be enabled in your reverse proxy, but Caddy automatically does this by default.
« Previous 1 2 3 4 Next »
Buy this article as PDF
(incl. VAT)
Buy Linux Magazine
US / Canada
UK / Australia
Subscribe to our Linux Newsletters
Find Linux and Open Source Jobs
Subscribe to our ADMIN Newsletters
Support Our Work
Linux Magazine content is made possible with support from readers like you. Please consider contributing when you’ve found an article to be beneficial.

News
-
Xubuntu Site Possibly Hacked
It appears that the Xubuntu site was hacked and briefly served up a malicious ZIP file from its download page.
-
LMDE 7 Now Available
Linux Mint Debian Edition, version 7, has been officially released and is based on upstream Debian.
-
Linux Kernel 6.16 Reaches EOL
Linux kernel 6.16 has reached its end of life, which means you'll need to upgrade to the next stable release, Linux kernel 6.17.
-
Amazon Ditches Android for a Linux-Based OS
Amazon has migrated from Android to the Linux-based Vega OS for its Fire TV.
-
Cairo Dock 3.6 Now Available for More Compositors
If you're a fan of third-party desktop docks, then the latest release of Cairo Dock with Wayland support is for you.
-
System76 Unleashes Pop!_OS 24.04 Beta
System76's first beta of Pop!_OS 24.04 is an impressive feat.
-
Linux Kernel 6.17 is Available
Linus Torvalds has announced that the latest kernel has been released with plenty of core improvements and even more hardware support.
-
Kali Linux 2025.3 Released with New Hacking Tools
If you're a Kali Linux fan, you'll be glad to know that the third release of this famous pen-testing distribution is now available with updates for key components.
-
Zorin OS 18 Beta Available for Testing
The latest release from the team behind Zorin OS is ready for public testing, and it includes plenty of improvements to make it more powerful, user-friendly, and productive.
-
Fedora Linux 43 Beta Now Available for Testing
Fedora Linux 43 Beta ships with Gnome 49 and KDE Plasma 6.4 (and other goodies).